
LeRobot SO-ARM101机械臂 - 【步骤五:数据集训练及评估】使用教程
·
ACT
参考官方教程ACT
训练
要训练一个控制您机器人策略,使用 python -m lerobot.scripts.train 脚本。需要一些参数。以下是一个示例命令:
lerobot-train \
  --dataset.repo_id=${HF_USER}/so101_test \
  --policy.type=act \
  --output_dir=outputs/train/act_so101_test \
  --job_name=act_so101_test \
  --policy.device=cuda \
  --wandb.enable=false \
  --steps=300000
如果您想在本地数据集上进行训练,请确保 repo_id 与数据收集时使用的名称匹配,并添加 --policy.push_to_hub=false。
lerobot-train \
  --dataset.repo_id=juxi/test \
  --policy.type=act \
  --output_dir=outputs/train/act_so101_test \
  --job_name=act_so101_test \
  --policy.device=cuda \
  --wandb.enable=false \
  --policy.push_to_hub=false\
  --steps=300000
命令解释
- 数据集指定:我们通过
--dataset.repo_id=${HF_USER}/so101_test参数提供了数据集。 - 训练步数:我们通过
--steps=300000修改训练步数,算法默认为800000,根据自己的任务难易程度,观察训练时候的loss来进行调整。 - 策略类型:我们使用
policy.type=act提供了策略,同样你可以更换[act,diffusion,pi0,pi0fast,pi0.5,sac,smolvla]等策略,这将从configuration_act.py加载配置。重要的是,这个策略会自动适应您机器人(例如laptop和phone)的电机状态、电机动作和摄像头数量,这些信息已保存在您的数据集中。 - 设备选择:我们提供了
policy.device=cuda,因为我们正在 Nvidia GPU 上进行训练,但您可以使用policy.device=mps在 Apple Silicon 上进行训练。 - 可视化工具:我们提供了
wandb.enable=true来使用 Weights and Biases 可视化训练图表。这是可选的,但如果您使用它,请确保您已通过运行wandb login登录。
如果你遇到了以下报错:
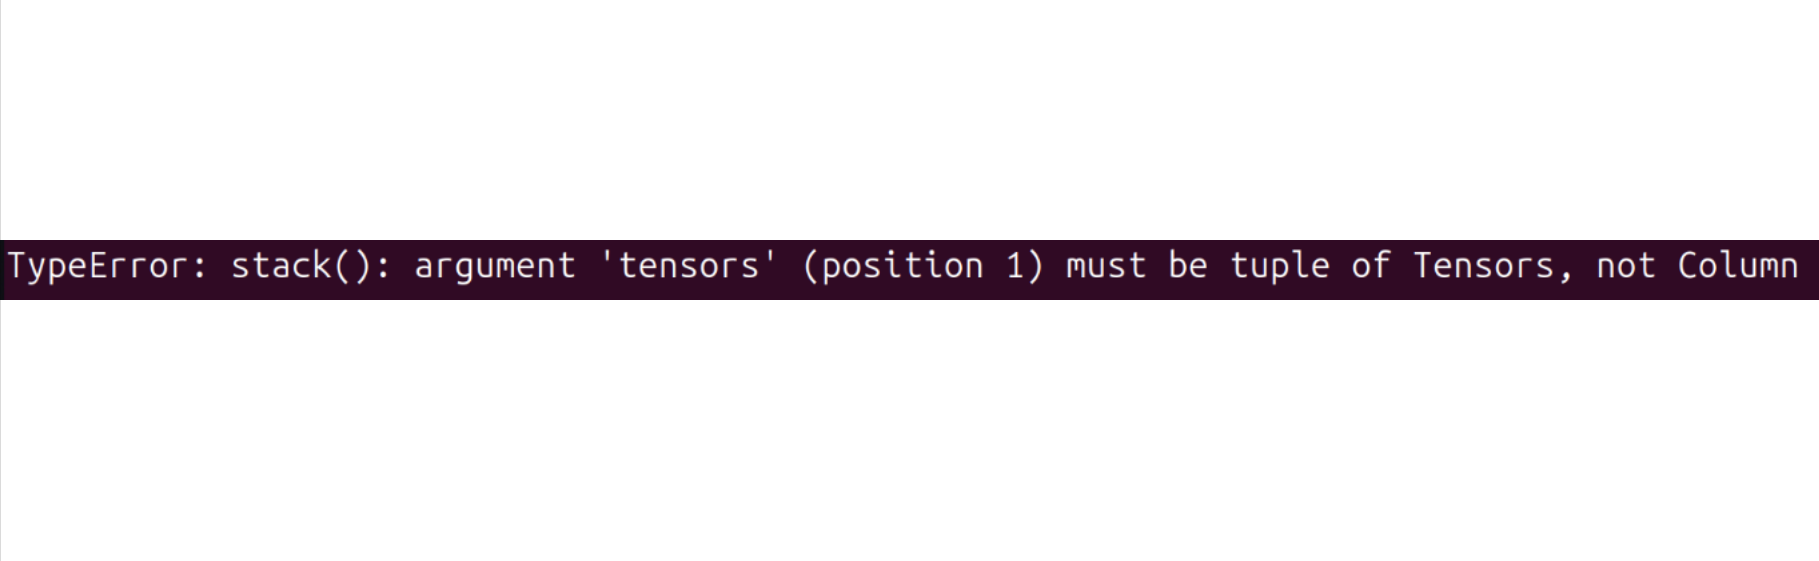
尝试运行以下命令来解决:pip install datasets==2.19
训练可能需要几个小时。您将在 outputs/train/act_so101_test/checkpoints 目录中找到训练结果权重文件。
要从某个训练结果权重文件恢复训练,下面是一个从 act_so101_test 策略的最后一个训练结果权重文件恢复训练的示例命令:
lerobot-train \
  --config_path=outputs/train/act_so101_test/checkpoints/last/pretrained_model/train_config.json \
  --resume=true
评估
您可以使用 lerobot/record.py 中的 record 功能,但需要将策略训练结果训练结果权重文件作为输入。例如,运行以下命令记录 10 个评估回合:
lerobot-record \
  --robot.type=so101_follower \
  --robot.port=/dev/ttyACM0 \
  --robot.cameras="{ front: {type: opencv, index_or_path: 0, width: 640, height: 480, fps: 30, fourcc: "MJPG"},   side: {type: opencv, index_or_path: 2, width: 640, height: 480, fps: 30,fourcc: "MJPG"}}" \
  --robot.id=my_awesome_follower_arm \
  --teleop.type=so101_leader \
  --teleop.port=/dev/ttyACM1 \
  --teleop.id=my_awesome_leader_arm \
  --display_data=false \
  --dataset.repo_id=juxi/eval_test123 \
  --dataset.single_task="Put the blue cube on the black box" \
  --dataset.episode_time_s=30 \
  --dataset.reset_time_s=30 \
  --dataset.num_episodes=5 \
  --policy.path=outputs/train/act_so101_test/checkpoints/last/pretrained_model
  --dataset.push_to_hub=false
--policy.path参数,指示您的策略训练结果权重文件的路径(例如outputs/train/act_so101_test/checkpoints/last/pretrained_model)。如果您将模型训练结果权重文件上传到 Hub,也可以使用模型仓库(例如${HF_USER}/act_so101_test)。- 数据集的名称
dataset.repo_id以 eval_开头,这个操作会在你评估的时候为你单独录制评估时候的视频和数据,将保存在eval_开头的文件夹下,例如juxi/eval_test123。 - 如果评估阶段遇到
File exists: 'home/xxxx/.cache/huggingface/lerobot/xxxxx/juxi/eval_xxxx'请先删除eval_开头的这个文件夹再次运行程序。 - 当遇到
mean is infinity. You should either initialize with stats as an argument or use a pretrained model请注意--robot.cameras这个参数中的front和side等关键词必须和采集数据集的时候保持严格一致。
Smolvla
pip install -e ".[smolvla]"
训练
lerobot-train \
  --policy.path=lerobot/smolvla_base \
  --dataset.repo_id=${HF_USER}/mydataset \
  --batch_size=64 \
  --steps=20000 \
  --output_dir=outputs/train/my_smolvla \
  --job_name=my_smolvla_training \
  --policy.device=cuda \
  --wandb.enable=true
验证
lerobot-record \
  --robot.type=so101_follower \
  --robot.port=/dev/ttyACM0 \
  --robot.id=my_awesome_follower_arm \ # <- Use your robot id
  --robot.cameras="{ front: {type: opencv, index_or_path: 0, width: 640, height: 480, fps: 30, fourcc: "MJPG"},   side: {type: opencv, index_or_path: 2, width: 640, height: 480, fps: 30,fourcc: "MJPG"}}" \
  --dataset.single_task="Put the blue cube on the black box" \
  --dataset.repo_id=juxi/eval_test123 \
  --dataset.episode_time_s=30 \
  --dataset.reset_time_s=30 \
  --dataset.num_episodes=5 \
  # <- Teleop optional if you want to teleoperate in between episodes \
  # --teleop.type=so101_leader \
  # --teleop.port=/dev/ttyACM0 \
  # --teleop.id=my_awesome_leader_arm \
  --policy.path=HF_USER/FINETUNE_MODEL_NAME # <- Use your fine-tuned model
Pi0
参考官方教程Pi0
pip install -e ".[pi]"
训练
lerobot-train \
  --policy.type=pi0 \
  --dataset.repo_id=juxi/eval_test123 \
  --job_name=pi0_training \
  --output_dir=outputs/pi0_training \
  --policy.pretrained_path=lerobot/pi0_base \
  --policy.compile_model=true \
  --policy.gradient_checkpointing=true \
  --policy.dtype=bfloat16 \
  --steps=20000 \
  --policy.device=cuda \
  --batch_size=32 \
  --wandb.enable=false
验证
lerobot-record \
  --robot.type=so101_follower \
  --robot.port=/dev/ttyACM0 \
  --robot.cameras="{ front: {type: opencv, index_or_path: 0, width: 640, height: 480, fps: 30, fourcc: "MJPG"},   side: {type: opencv, index_or_path: 2, width: 640, height: 480, fps: 30,fourcc: "MJPG"}}" \
  --robot.id=my_awesome_follower_arm \
  --display_data=false \
  --dataset.repo_id=juxi/eval_test123 \
  --dataset.single_task="Put the blue cube on the black box" \
  --policy.path=outputs/pi0_training/checkpoints/last/pretrained_model
Pi0.5
pip install -e ".[pi]"
训练
lerobot-train \
    --dataset.repo_id=juxi/eval_test123 \
    --policy.type=pi05 \
    --output_dir=outputs/pi05_training \
    --job_name=pi05_training \
    --policy.pretrained_path=lerobot/pi05_base \
    --policy.compile_model=true \
    --policy.gradient_checkpointing=true \
    --wandb.enable=false \
    --policy.dtype=bfloat16 \
    --steps=3000 \
    --policy.device=cuda \
    --batch_size=32
验证
lerobot-record \
  --robot.type=so101_follower \
  --robot.port=/dev/ttyACM0 \
  --robot.cameras="{ front: {type: opencv, index_or_path: 0, width: 640, height: 480, fps: 30, fourcc: "MJPG"},   side: {type: opencv, index_or_path: 2, width: 640, height: 480, fps: 30,fourcc: "MJPG"}}" \
  --robot.id=my_awesome_follower_arm \
  --display_data=false \
  --dataset.repo_id=juxi/eval_test123 \
  --dataset.single_task="Put the blue cube on the black box" \
  --policy.path=outputs/pi05_training/checkpoints/last/pretrained_model
GR00T N1.5
注意事项
- 如果评估阶段遇到
File exists: 'home/xxxx/.cache/huggingface/lerobot/xxxxx/juxi/eval_xxxx'
请先删除eval_开头的这个文件夹再次运行程序。
- 如果评估阶段遇到
`mean` is infinity. You should either initialize with `stats` as an argument or use a pretrained model
请注意--robot.cameras这个参数中的front和side等关键词必须和采集数据集的时候保持严格一致。
- 如果你维修或者更换过机械臂零件,请完全删除
~/.cache/huggingface/lerobot/calibration/robots或者~/.cache/huggingface/lerobot/calibration/teleoperators下的文件并重新校准机械臂,否者会出现报错提示,校准的机械臂信息会存储该目录下的json文件中。 - 在3060的8G笔记本上训练ACT的50组数据的时间大概为6小时,在4090和A100的电脑上训练50组数据时间大概为2~3小时。
- 数据采集过程中要确保摄像头位置和角度和环境光线的稳定,并且减少摄像头采集到过多的不稳定背景和行人,否则部署的环境变化过大会导致机械臂无法正常抓取。
- 数据采集命令的num-episodes要确保采集数据足够,不可中途手动暂停,因为在数据采集结束后才会计算数据的均值和方差,这在训练中是必要的数据。
- 如果程序提示无法读取USB摄像头图像数据,请确保USB摄像头不是接在Hub上的,USB摄像头必须直接接入设备,确保图像传输速率快。
更多推荐

 8
8 0
0- 0


 已为社区贡献1条内容

所有评论(0)