
SpringCloudAlibaba第三章(分布式事务seata) -2024
目录
目录
1:什么是seata
Seata是一款开源的分布式事务解决方案,致力于在微服务架构下提供高性能和简单易用的分布式事务服务。
官网:http:seata.io/zh-cn/ 重点:一定要学习官网
2:Seata架构和实现事务模式
2.1:seata的架构

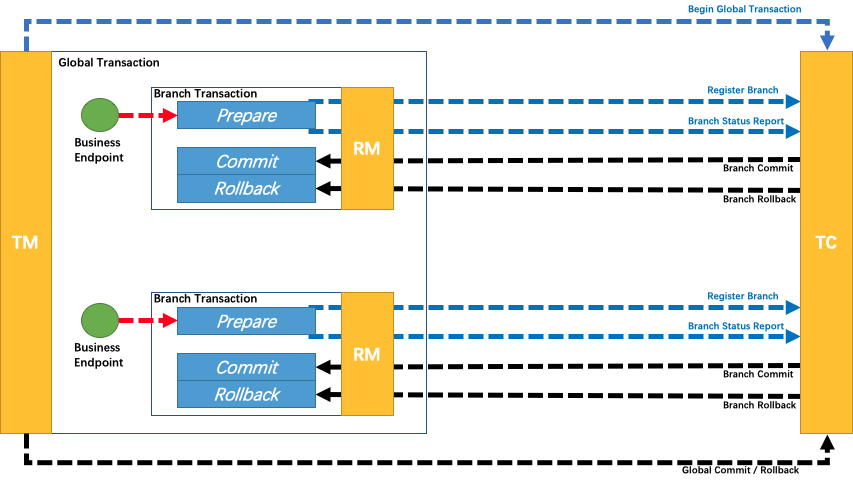
1:TC (Transaction Coordinator) - 事务协调者
事务协调者也就是seata的服务,维护全局事务和分支事务,驱动全局事务的提交和回滚。分支事务需要向seata注册相同的事务id
2:TM (Transaction Manager) - 事务管理器
定义全局事务的范围:
1:TM也就是使用@GlobalTransactional注解的服务,标志着全局事务的开始,向TC(seata服务)申请一个全局事务ID(XID)
2:全局事务XID在分支事务RM之间传播,开始全局事务。提交或回滚全局事务。
3:RM分支事务向TC(seata服务)中注册了分支事务,并且携带了全局事务ID
4:TM向TC发起了全局事务ID的提交或者火滚
5:TC调度全局事务,让各个分支事务提交或者回滚
3:RM (Resource Manager) - 资源管理器
管理分支事务处理的资源,也就是各个分支事务,与TC交谈以注册分支事务和报告分支事务的状态可以提交或者失败,并驱动分支事务提交或回滚。
2.2:Seata实现事务的4种方式
seata实现分布式事务的4种模式
1:AT模式(常用)自动提交(Automatic Transaction)
2:TCC模式(常用)
3:SAGA模式(不常用,链式调用,适用于不同的老系统,有补偿机制,代码复杂)
4:XA模式(不常用)
3:Seata服务(TC)的下载安装
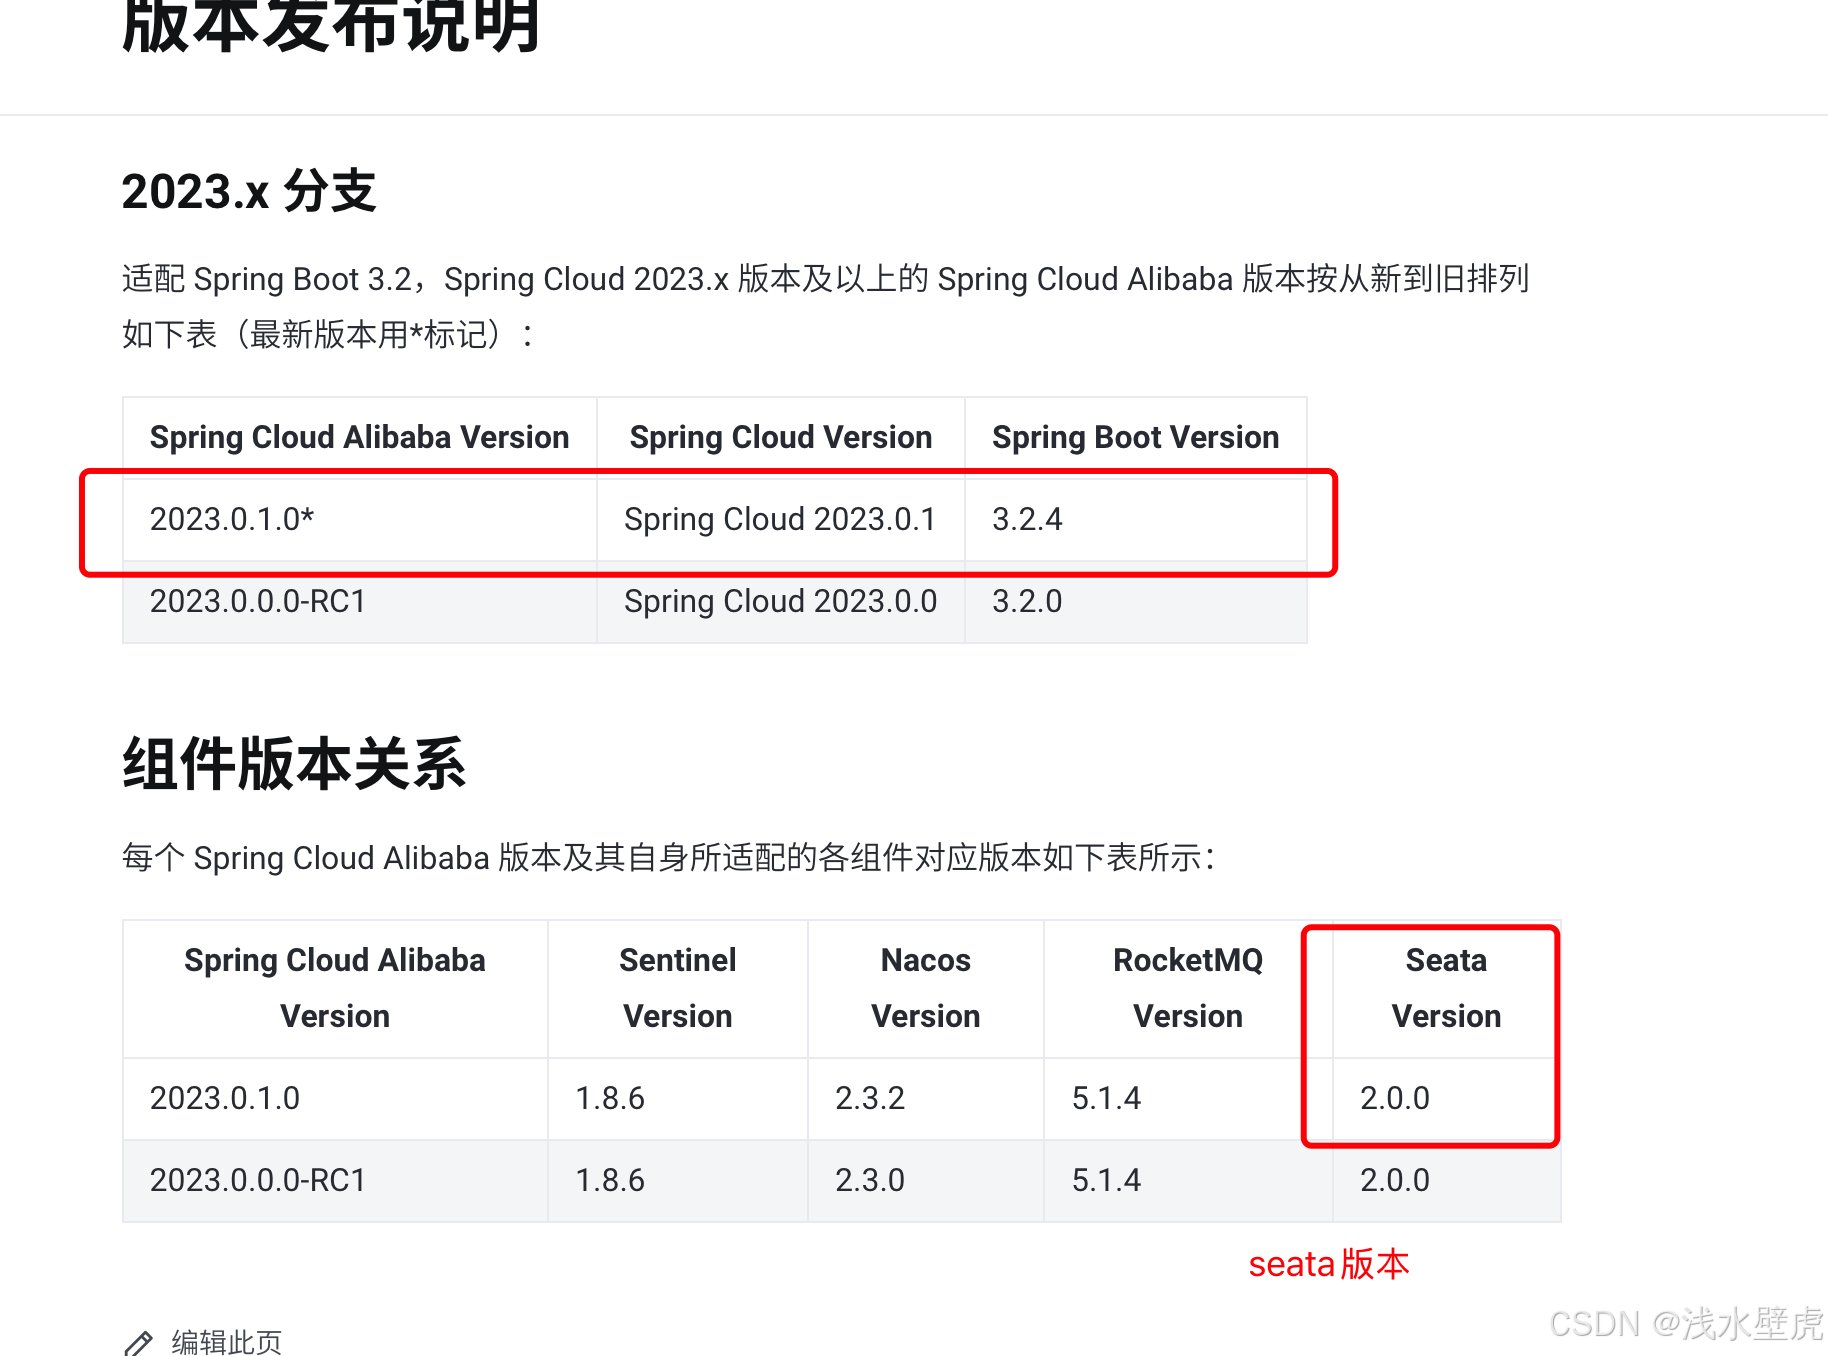
1:版本选择:来自官网 Releases · apache/incubator-seata · GitHub
下载git官网:
https://github.com/apache/incubator-seata/releases
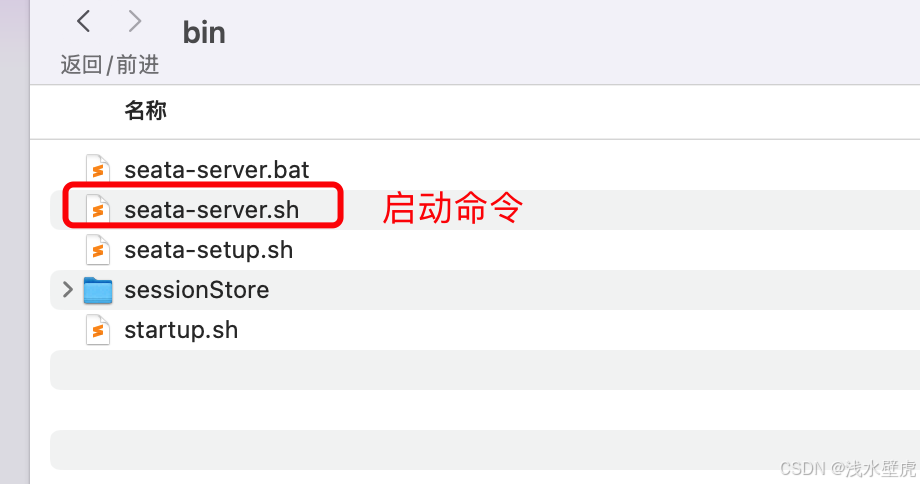
Seata-Server安装
解压seata-server.zip,进入bin目录启动seata-server.sh
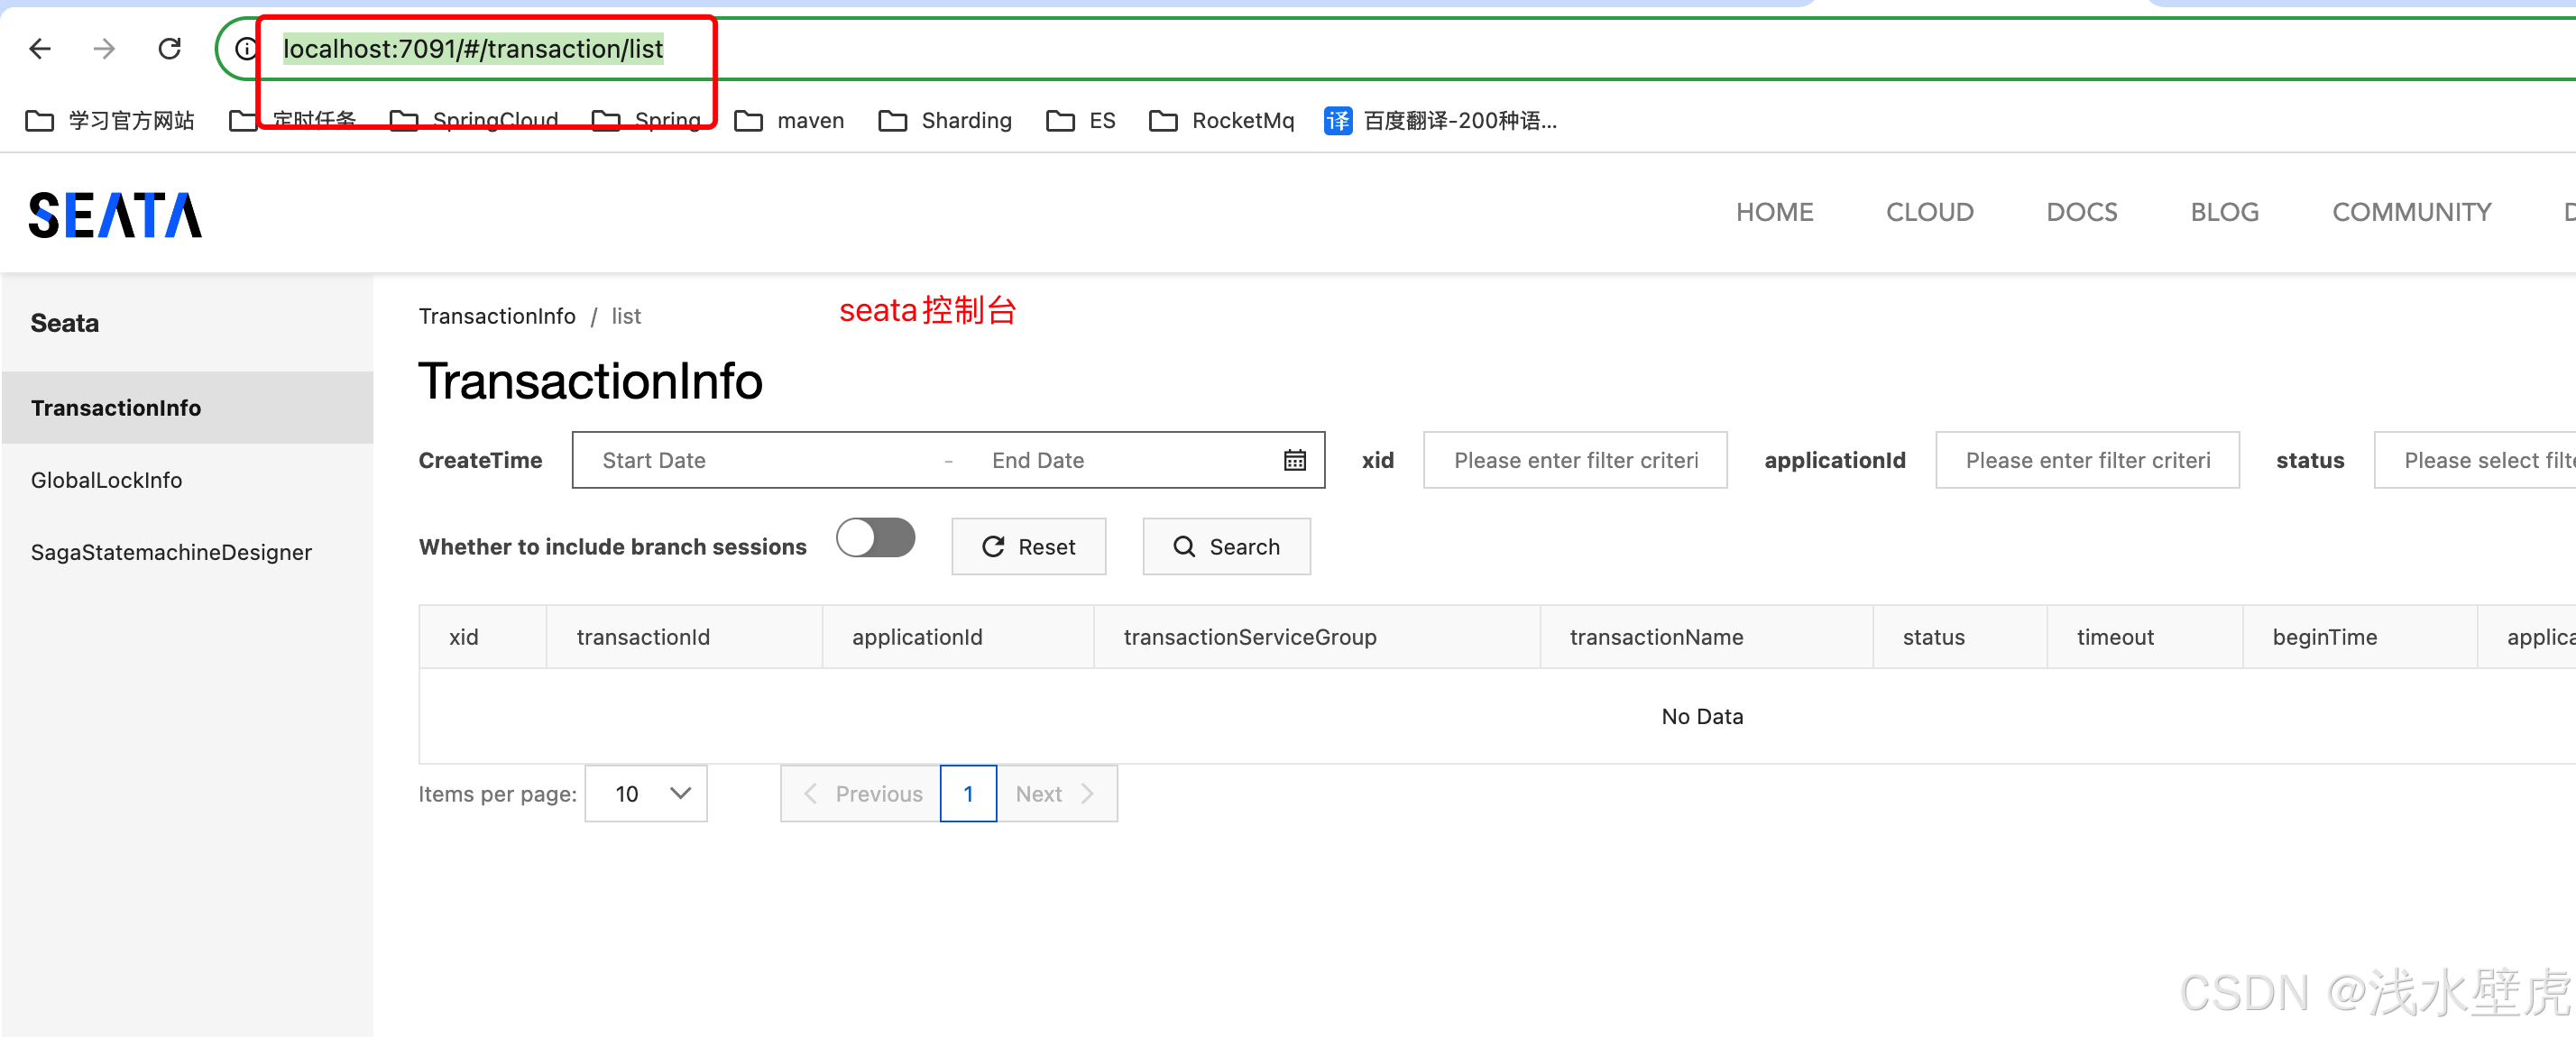
访问地址: http://localhost:7091/#/transaction/list
4:Seata的三种存储模式
因为seata需要对全局事务和分支事务进行管理存储,所以有三种存储模式
分别是file模式,DB模式,redis模式

可以在application.yml配置文件中配置,example是参考文件

4.1:file模式(默认)
1:file会将事务数据存储到本地文件夹

2:启动sh seata-server.sh -p 7091 -h 127.0.0.1
到bin目录下看到本地存储的sessionStore文件夹,证明了本地存储
3:访问 http://localhost:7091/#/transaction/list
账户密码都是seata 进入seata控制台
4.2:DB模式(最常用的模式)
DB会将事务数据存储到自己设置的数据库
1:修改conf下的application.yml
#  Copyright 1999-2019 Seata.io Group.
#
#  Licensed under the Apache License, Version 2.0 (the "License");
#  you may not use this file except in compliance with the License.
#  You may obtain a copy of the License at
#
#  http://www.apache.org/licenses/LICENSE-2.0
#
#  Unless required by applicable law or agreed to in writing, software
#  distributed under the License is distributed on an "AS IS" BASIS,
#  WITHOUT WARRANTIES OR CONDITIONS OF ANY KIND, either express or implied.
#  See the License for the specific language governing permissions and
#  limitations under the License.

server:
  port: 7091 #seata服务端口

spring:
  application:
    name: seata-server #注册到服务中心的服务名字

logging:
  config: classpath:logback-spring.xml
  file:
    path: ${log.home:${user.home}/logs/seata}
  extend:
    logstash-appender:
      destination: 127.0.0.1:4560
    kafka-appender:
      bootstrap-servers: 127.0.0.1:9092
      topic: logback_to_logstash

console:
  user:
    username: seata
    password: seata


seata:
  config:
    # 配置到nacos support: nacos, consul, apollo, zk, etcd3
    type: nacos
    nacos:
      server-addr: 127.0.0.1:8848
      namespace:
      group: SEATA_GROUP
      username: nacos
      password: nacos
      context-path:
      ##if use MSE Nacos with auth, mutex with username/password attribute
      #access-key:
      #secret-key:
      data-id: seataServer.properties

  registry:
    #  注册到nacos support: nacos, eureka, redis, zk, consul, etcd3, sofa
    type: nacos
    nacos:
      application: seata-server
      server-addr: 127.0.0.1:8848
      group: SEATA_GROUP
      namespace:
      cluster: default
      username: nacos
      password: nacos
      context-path:
      ##if use MSE Nacos with auth, mutex with username/password attribute
      #access-key:
      #secret-key:
  store:
    #  事务管理采用db模式  support: file 、 db 、 redis 、 raft
    mode: db
    session:
      mode: db
    lock:
      mode: db
    db:
      datasource: druid
      db-type: mysql
      driver-class-name: com.mysql.cj.jdbc.Driver
      url: jdbc:mysql://localhost:3306/SpringCloud2024_Seata?useUnicode=true&characterEncoding=utf-8&useSSL=false
      user: root
      password: 123456
      min-conn: 10
      max-conn: 100
      global-table: global_table
      branch-table: branch_table
      lock-table: lock_table
      distributed-lock-table: distributed_lock
      query-limit: 1000
      max-wait: 5000
  #  server:
  #    service-port: 8091 #If not configured, the default is '${server.port} + 1000'
  security:
    secretKey: SeataSecretKey0c382ef121d778043159209298fd40bf3850a017
    tokenValidityInMilliseconds: 1800000
    ignore:
      urls: /,/**/*.css,/**/*.js,/**/*.html,/**/*.map,/**/*.svg,/**/*.png,/**/*.jpeg,/**/*.ico,/api/v1/auth/login,/metadata/v1/**
2:然后找到建表语句在mysql的Seata库中建表
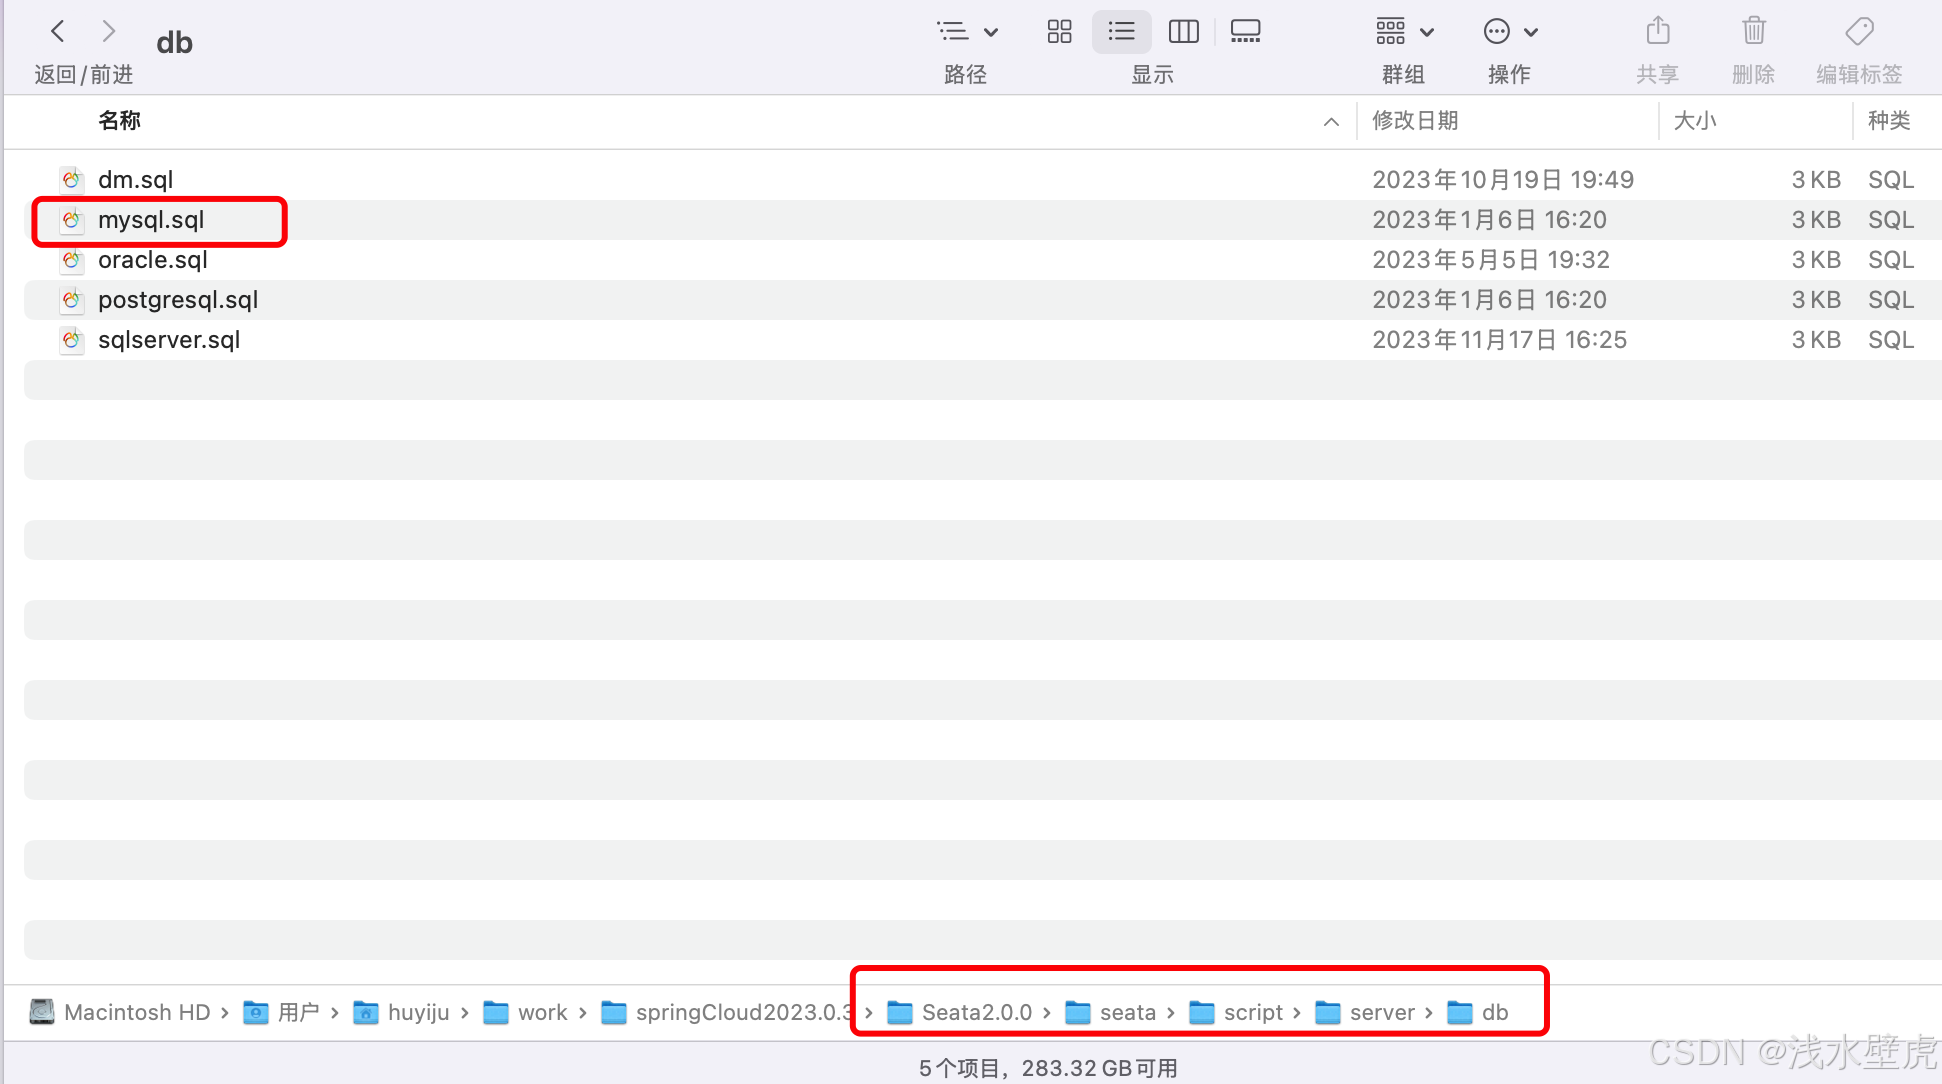
在本机的数据库Seata下边执行建表sql会得到4张表
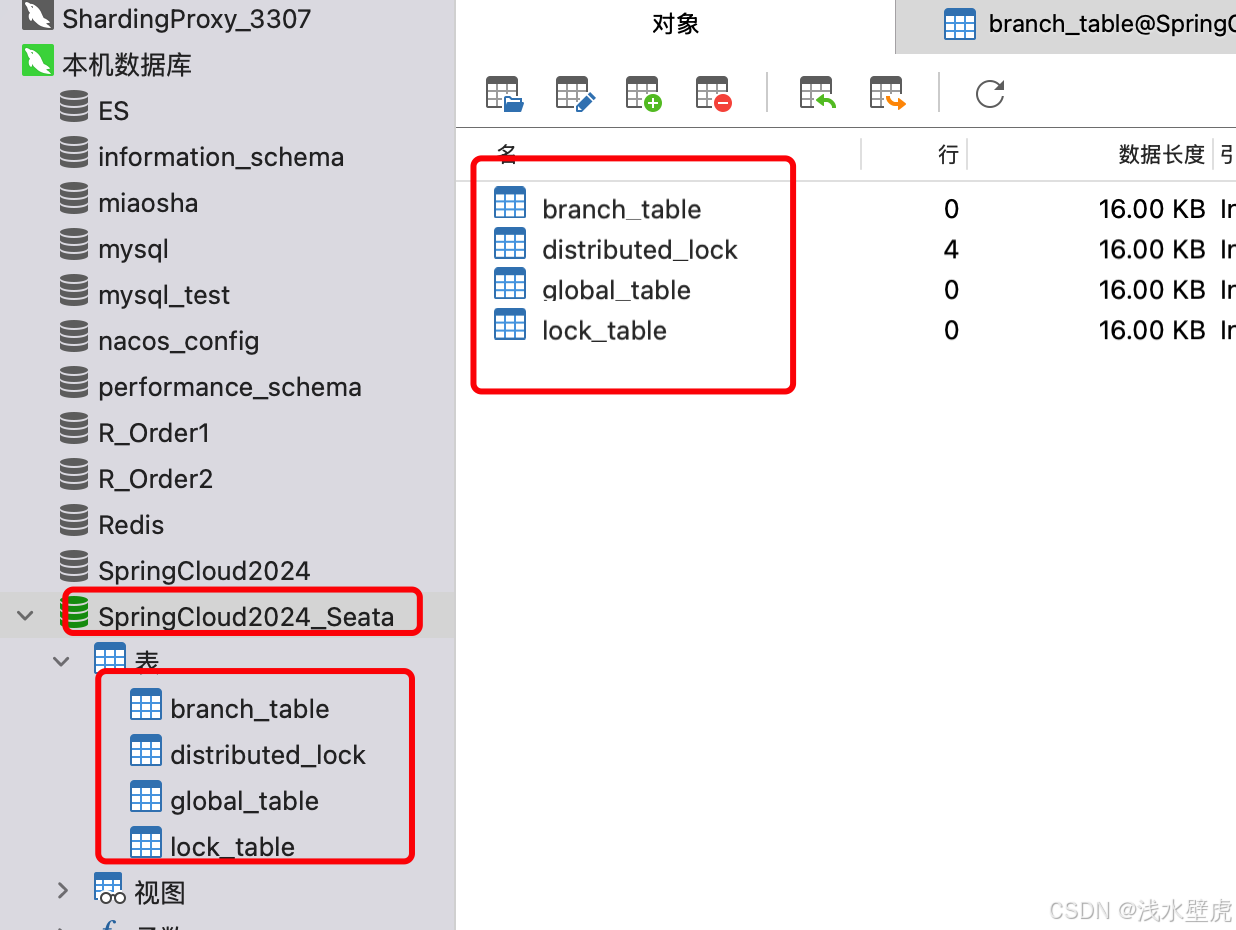
3:启动seata-server.sh -m db 以数据库存储方式启动
可以在nacos中看到 seata-server的注册服务
4:访问 http://localhost:7091/#/transaction/list
账户密码都是seata 进入seata控制台
4.3:redis模式(没有写)
redis会将事务数据存储到自己设置的redis,跟上边的相似的配置
5:seata的AT模式
详见官网:Seata AT 模式 | Seata
AT 模式是 Seata 创新的一种非侵入式的分布式事务解决方案,Seata 在内部做了对数据库操作的代理层,我们使用 Seata AT 模式时,实际上用的是 Seata 自带的数据源代理 DataSourceProxy,Seata 在这层代理中加入了很多逻辑,比如插入回滚 undo_log 日志,检查全局锁等。
也就是说用了DataSourceProxy代理,在插入业务数据的时候同时插入undo_log日志表,在同一个本地分支事务中,要么同时成功,要么同事失败。
本文中,我们将重点介绍 Seata AT 模式的使用,如果您对于 AT 模式原理感兴趣,还请阅读对应于本篇文章的开发者指南。
整体机制
两阶段提交协议的演变:
- 一阶段:业务数据和回滚日志记录在同一个本地事务中提交,释放本地锁和连接资源。
- 二阶段:
- 提交异步化,非常快速地完成。
- 回滚通过一阶段的回滚日志undo_log进行反向补偿。
5.1:AT模式模式实现机制
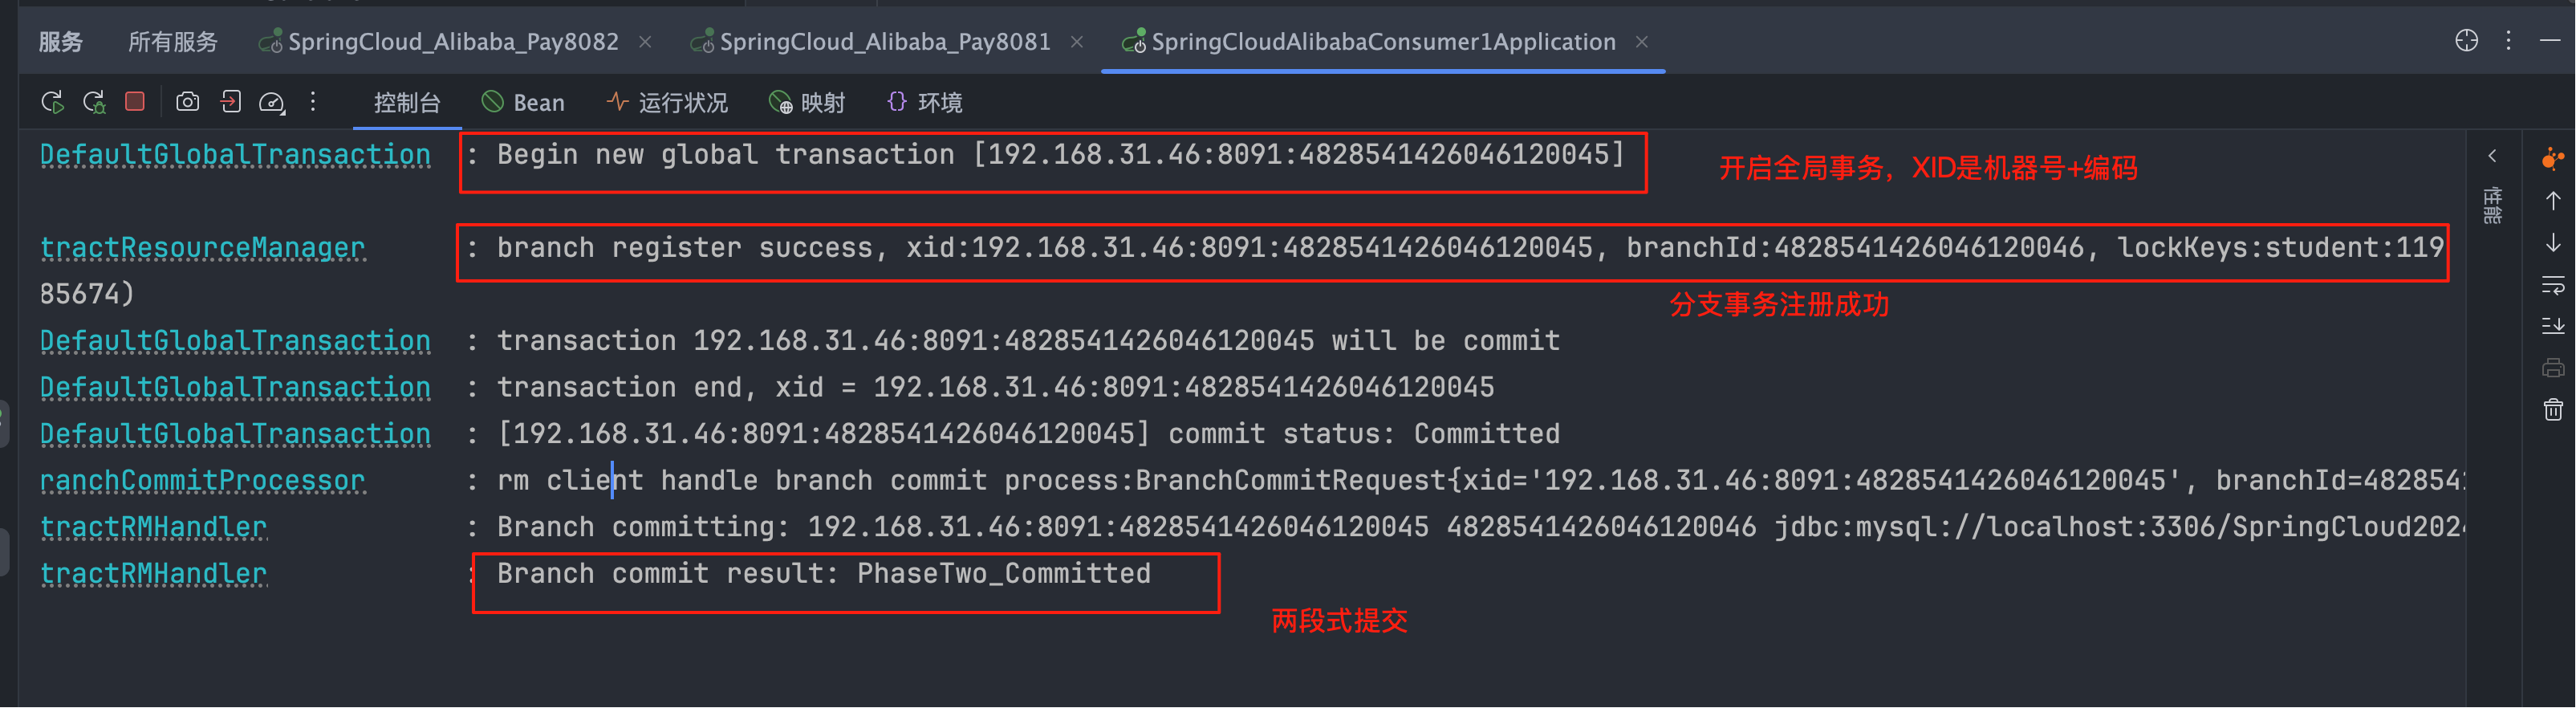
AT模式是两段式提交的演变
一阶段:业务数据和回滚日志(undo log)在同一个本地事务中需要先拿到本地锁和全局锁提交,只会释放本地锁。
二阶段:commit提交是异步化的,非常快速。rollback是根据一阶段的回滚日志来进行回滚。
无论提交还是回滚都会在这个时候释放全局锁。
AT模式的写隔离和读隔离,这是啥意思呢?详见官网的解释和图片实例,由于解释和图片很多,这里只做简单的解释
写隔离:
两个事务修改同一条数据,需要先竞争获取本地锁(也就是行锁)。事务A获取到本地锁,一阶段提交的时候需要再获取全局锁才能提交本地锁,竞争的事务B等待,等到事务A全局锁二阶段提交后,等待的事务B才能再次获取到全局锁,提交自己的事务。保证了就像本地事务一样写操作的安全性也就是写隔离。
读隔离:
我们知道mysql的默认隔离级别的RR(可重复读),能够防止脏读,不可重复读,幻读的情况,但是当我们使用分布式事务seata的时候,他能做到RR的隔离级别吗?答案是不能,seata只能做到在Seata(AT 模式)的默认全局隔离级别是 读未提交(Read Uncommitted)。他会读取到别的事务没有提交的数据,发生脏读。
怎样避免发生脏读,或者更高的安全性?如果应用在特定场景下,必需要求全局的读已提交 ,目前 Seata 的方式是通过 SELECT FOR UPDATE 语句的代理。
5.2:AT模式的案例实现
我们首先介绍项目情况,9002通过feign调用9003项目,9002新增一条学生表数据,9003新增一条老师表数据,通过seata的AT模式验证分布式事务

0:在每一个数据库下边创建undo表,用于数据回滚
CREATE TABLE IF NOT EXISTS `undo_log`
(
    `branch_id`     BIGINT       NOT NULL COMMENT 'branch transaction id',
    `xid`           VARCHAR(128) NOT NULL COMMENT 'global transaction id',
    `context`       VARCHAR(128) NOT NULL COMMENT 'undo_log context,such as serialization',
    `rollback_info` LONGBLOB     NOT NULL COMMENT 'rollback info',
    `log_status`    INT(11)      NOT NULL COMMENT '0:normal status,1:defense status',
    `log_created`   DATETIME(6)  NOT NULL COMMENT 'create datetime',
    `log_modified`  DATETIME(6)  NOT NULL COMMENT 'modify datetime',
    UNIQUE KEY `ux_undo_log` (`xid`, `branch_id`)
) ENGINE = InnoDB AUTO_INCREMENT = 1 DEFAULT CHARSET = utf8mb4 COMMENT ='AT transaction mode undo table';
ALTER TABLE `undo_log` ADD INDEX `ix_log_created` (`log_created`);
1:pom文件配置9002和9003项目的pom文件一样
<!--springboot3.0.3适配的springCloud版本是2022.0.0-->
    <parent>
        <groupId>org.springframework.boot</groupId>
        <artifactId>spring-boot-starter-parent</artifactId>
        <version>3.2.7</version>
        <relativePath/> <!-- lookup parent from repository -->
    </parent>
    <groupId>com.example</groupId>
    <artifactId>SCA01_Seata_9003</artifactId>
    <version>0.0.1-SNAPSHOT</version>


  <!--
    1:springCloud阿里巴巴2023.0.1.0 官网https://sca.aliyun.com/en/
    适用于Spring Boot 3.2
    -->
    <properties>
        <java.version>17</java.version>
        <spring-cloud-alibaba.version>2023.0.1.0</spring-cloud-alibaba.version>
        <spring-cloud.version>2023.0.3</spring-cloud.version>
    </properties>


    <dependencyManagement>
        <dependencies>
            <dependency>
                <groupId>com.alibaba.cloud</groupId>
                <artifactId>spring-cloud-alibaba-dependencies</artifactId>
                <version>${spring-cloud-alibaba.version}</version>
                <type>pom</type>
                <scope>import</scope>
            </dependency>
            <dependency>
                <groupId>org.springframework.cloud</groupId>
                <artifactId>spring-cloud-dependencies</artifactId>
                <version>${spring-cloud.version}</version>
                <type>pom</type>
                <scope>import</scope>
            </dependency>
        </dependencies>
    </dependencyManagement>

    <dependencies>


        <dependency>
            <groupId>org.springframework.boot</groupId>
            <artifactId>spring-boot-starter-web</artifactId>
        </dependency>
        <dependency>
            <groupId>com.mysql</groupId>
            <artifactId>mysql-connector-j</artifactId>
            <scope>runtime</scope>
        </dependency>

        <dependency>
            <groupId>org.springframework.boot</groupId>
            <artifactId>spring-boot-configuration-processor</artifactId>
            <optional>true</optional>
        </dependency>
        <dependency>
            <groupId>org.projectlombok</groupId>
            <artifactId>lombok</artifactId>
            <optional>true</optional>
        </dependency>
        <dependency>
            <groupId>org.springframework.boot</groupId>
            <artifactId>spring-boot-starter-test</artifactId>
            <scope>test</scope>
        </dependency>

        <!-- 德鲁伊数据源-->
        <dependency>
            <groupId>com.alibaba</groupId>
            <artifactId>druid-spring-boot-starter</artifactId>
            <version>1.2.16</version>
        </dependency>
        <!-- mybatisPlus依赖-->
        <dependency>
            <groupId>com.baomidou</groupId>
            <artifactId>mybatis-plus-boot-starter</artifactId>
            <version>3.5.3.1</version>
        </dependency>

        <!--spring-cloud-starter-alibaba服务注册-->
        <dependency>
            <groupId>com.alibaba.cloud</groupId>
            <artifactId>spring-cloud-starter-alibaba-nacos-discovery</artifactId>
        </dependency>
        <!--spring-cloud-starter-alibaba配置管理-->
        <!--        <dependency>-->
        <!--            <groupId>com.alibaba.cloud</groupId>-->
        <!--            <artifactId>spring-cloud-starter-alibaba-nacos-config</artifactId>-->
        <!--        </dependency>-->
        <!--sentinel依赖的jar-->
        <dependency>
            <groupId>com.alibaba.cloud</groupId>
            <artifactId>spring-cloud-starter-alibaba-sentinel</artifactId>
        </dependency>


        <!--seata依赖-->
        <dependency>
            <groupId>io.seata</groupId>
            <artifactId>seata-spring-boot-starter</artifactId>
        </dependency>
        <dependency>
            <groupId>com.alibaba.cloud</groupId>
            <artifactId>spring-cloud-starter-alibaba-seata</artifactId>
            <exclusions>
                <exclusion>
                    <groupId>io.seata</groupId>
                    <artifactId>seata-spring-boot-starter</artifactId>
                </exclusion>
            </exclusions>
        </dependency>


    </dependencies>
2:9002和9003的application.properties也是基本一样
#0:项目信息
server.port=9003
spring.application.name=SCA01-Seata-9003

##1:nacos集群地址 用来注册服务nacos
spring.cloud.nacos.discovery.server-addr=127.0.0.1:8851,127.0.0.1:8853,127.0.0.1:8855
##定义坐标
spring.cloud.nacos.discovery.group=SEATA_GROUP
#端点监控
management.endpoints.web.exposure.include=*

#2:seata分布式事务配置 default_tx_group=default 来源于db模式的seata配置文件
seata.enabled=true
seata.service.vgroup-mapping.default_tx_group=default
seata.service.disable-global-transaction=false
seata.service.grouplist.default=127.0.0.1:8091

#3:注册sentinel监控地址
spring.cloud.sentinel.transport.dashboard=localhost:8080
#默认8719端口,假如被占用会自动从8719开始依次+1扫描,直至找到未被占用的端口
spring.cloud.sentinel.transport.port=8719
#启动就会加载
spring.cloud.sentinel.eager=true

#4:德鲁伊数据源
spring.datasource.driver-class-name=com.mysql.cj.jdbc.Driver
spring.datasource.type=com.alibaba.druid.pool.DruidDataSource
spring.datasource.url=jdbc:mysql://localhost:3306/Seata3?useUnicode=true&characterEncoding=utf-8&useSSL=false
spring.datasource.username=root
spring.datasource.password=123456
spring.datasource.druid.initial-size=10
spring.datasource.druid.max-active=20
spring.datasource.druid.min-idle=10
spring.datasource.druid.max-wait=4000
mybatis-plus.configuration.log-impl=org.apache.ibatis.logging.stdout.StdOutImpl
3:9002核心代码
   //9002的controller代码用于外部请求
    @GetMapping(value = "add")
    public List<Student> add(Student student){
        return studentService.add(student);
    }


    //9002的全局事务代码
    @GlobalTransactional
    @Override
    public List<Student> add(Student student) {
        //9002项目添加学生表信息
        studentMapper.insert(student);
        //这里模拟报错,9002已经第一阶段提交
        //int a = 9002 / 0;

        //feign调用9003项目添加老师表信息
        Teacher teacher = new Teacher();
        teacher.setName("测试老师22");
        teacher.setAddress("洛阳");
        feignService9003.add(teacher);

        //这里模拟报错,9002和9003都已经第一阶段提交,第二阶段需要回滚 debug断点
        //可以在数据库的看到学生表和老师表存在了新增的数据,并且undo日志也存在
        //这就是seata的第一阶段提交,读未提交(Read Uncommitted) 其他的事务会发生脏读
        int a=9002/0;
        return studentMapper.selectList(null);
    }


//远程调用nacos上的SCA01_Seata_9003服务
@FeignClient(value = "SCA01-Seata-9003")
public interface FeignService9003 {

    @GetMapping(value = "selectById")
    Teacher selectById(@RequestParam(value = "id") int id);

    @GetMapping(value = "selectAll")
    List<Teacher> selectByALL();

    @GetMapping(value = "deleteById")
    int deleteByID(@RequestParam(value = "id") int id);


    @PostMapping(value = "add")
    boolean add(@RequestBody Teacher teacher);

}
4:9003核心代码
 @PostMapping(value = "add")
    public boolean add(@RequestBody Teacher teacher){
        boolean save = teacherService.save(teacher);
        //9003模拟报错验证全局事务
        //int a=9003/0;
        return save;
    }
5:代码测试,断点验证,断点打到 int a=9002/0;
http://localhost:9002/add?name=学生张三22&address=北京1&score=88


断点接着走会报错,因为int a=9002/0 会报异常,数据能回滚吗? 我们再次查询两个表发现数据都不在了,根据undo日志回滚了。这就验证了分布式事务生效了,你也可以在其他的地方验证,都会生效,这里不过多举例。
读隔离验证:这里有个问题,seata修改数据会发生锁竞争,是安全的。但是修改的数据会在数据库被我们查到,会发生读已提交(其他事务读取到本事务没有提交的数据),我们怎么保证安全呢?

读隔离验证:我们可以在可以在9003代码中加入 for update
//9003的controller
 @GetMapping(value = "selectAll")
    public List<Teacher> selectByALL() throws InterruptedException {
        return teacherService.selectList();
    }

//9003的service 加入GlobalTransactional
 @GlobalTransactional
    @Override
    public List<Teacher> selectList() {
        return teacherMapper.selectList();
    }

//9003的mapper 假如for update
 <select id="selectList" resultType="com.example.SCA01_Seata_9003.entity.Teacher">
        select * from Teacher for update
</select>读隔离:再次验证,读已提交(Read committed)

5.3:AT模式的优缺点
两段式提交的变种,第一阶段就会提交本地事务还没有提交全局事务的时候,其他事务能查询到插入的数据(会导致脏数据,隔离级别是读未提交),第二阶段异步提交、回滚
写隔离安全
读隔离在msyql数据库本地事务隔离级别 读已提交(Read Committed) 或以上的基础上,Seata(AT 模式)的默认全局隔离级别是 读未提交(Read Uncommitted)。必需要求全局的 读已提交 ,目前 Seata 的方式是通过 SELECT FOR UPDATE 语句的代理。
6:seata的TCC模式
详见官网
6.1:TCC模式模式实现机制
TCC也是两阶段提交的演变,整体是 两阶段提交 的模型。
全局事务是由若干分支事务组成的,分支事务要满足 两阶段提交 的模型要求,即需要每个分支事务都具备自己的:
一阶段: prepare 行为
二阶段: commit 或 rollback 行为
TCC和AT模式对比
AT 模式基于 支持本地 ACID 事务 的 关系型数据库:(不需要额外代码,只需要在配置和注解)
一阶段 prepare 行为:在本地事务中,一并提交业务数据更新和相应回滚日志记录。
二阶段 commit 行为:马上成功结束,自动 异步批量清理回滚日志。
二阶段 rollback 行为:通过回滚日志,自动 生成补偿操作,完成数据回滚。
相应的,TCC 模式,不依赖于底层数据资源的事务支持:(也就需要是自己写代码)
一阶段 prepare 行为:调用 自定义 的 prepare 逻辑。
二阶段 commit 行为:调用 自定义 的 commit 逻辑。
二阶段 rollback 行为:调用 自定义 的 rollback 逻辑。
6.2:TCC模式的案例实现
跟前边相似,9022通过feign调用9023

0:删除数据库下的undo表
1:pom文件配置9002和9003项目的pom文件一样
2:9022和9023的application.properties也是上边一样
3:9022核心代码
 //9022的controller代码方法,用于外部请求
    @GetMapping(value = "add")
    @GlobalTransactional //TCC模式注解必须加到外部
    public List<Student> add(Student student)
    {
        System.out.println("进入TCC业务测试");
        return studentService.addStudent(student);
    }


//service接口代码
@LocalTCC
public interface StudentService extends IService<Student> {

    //两阶段的业务操作name就是一个动态的bean
    @TwoPhaseBusinessAction(name = "addStudent",
            commitMethod = "addStudent_commit",
            rollbackMethod = "addStudent_rollback")
    List<Student> addStudent(@BusinessActionContextParameter(value ="student") Student student);

    //TCC的CommitMethod 手动提交 BusinessActionContext是map key就是student
    Boolean addStudent_commit(BusinessActionContext businessActionContext);

    //TCC的RollbackMethod 手动回滚
    Boolean addStudent_rollback(BusinessActionContext businessActionContext) throws JsonProcessingException;

}


//service接口实现类代码
@Service
public class StudentServiceImpl extends ServiceImpl<StudentMapper, Student>
        implements StudentService {

    @Autowired
    StudentMapper studentMapper;

    @Autowired
    FeignService9023 feignService9023;


    //9022的TCC全局事务代码
    //@GlobalTransactional 这里不加注解  注解加到外边
    @Override
    public List<Student> addStudent(Student student) {
        //9002项目添加学生表信息
        studentMapper.insert(student);
        System.out.println("插入学生表信息:" + student);
        //这里模拟TCC报错,9022已经第一阶段提交
        //int a = 9022 / 0;

        //feign调用9003项目添加老师表信息
        Teacher teacher = new Teacher();
        teacher.setName("测试老师22");
        teacher.setAddress("洛阳");
        feignService9023.add(teacher);

        //这里模拟报错,9022和9023都已经第一阶段提交,第二阶段需要回滚 debug断点
        //可以在数据库的看到学生表和老师表存在了新增的数据,并且undo日志也存在
        //这就是seata的第一阶段提交,读未提交(Read Uncommitted) 其他的事务会发生脏读
        int a = 9022 / 0;
        return studentMapper.selectList(null);
    }

    @Override
    public Boolean addStudent_commit(BusinessActionContext businessActionContext) {
        System.out.println("=====9022的addStudent的提交方法");
        return true;
    }

    @Override
    //回滚需要手动操作回滚
    public Boolean addStudent_rollback(BusinessActionContext businessActionContext) throws JsonProcessingException {
        System.out.println("=====9022的addStudent的回滚方法");
        String studentJson = businessActionContext.getActionContext("student").toString();

        ObjectMapper objectMapper = new ObjectMapper();
        Student student = objectMapper.readValue(studentJson, Student.class);

        Map map = new HashMap();
        map.put("name", student.getName());
        map.put("address", student.getAddress());
        studentMapper.deleteByMap(map);
        return true;
    }
}


//feign的远程调用nacos上的SCA01_Seata_9023服务
@FeignClient(value = "SCA01-SeataTCC-9023")
public interface FeignService9023 {

    @GetMapping(value = "selectById")
    Teacher selectById(@RequestParam(value = "id") int id);

    @GetMapping(value = "selectAll")
    List<Teacher> selectByALL();

    @GetMapping(value = "deleteById")
    int deleteByID(@RequestParam(value = "id") int id);


    @PostMapping(value = "add")
    boolean add(@RequestBody Teacher teacher);
}
4:9023核心代码,提供给9022通过feign调用
//9023的controller方法 给feign调用
 @PostMapping(value = "add")
    public boolean add(@RequestBody Teacher teacher){
         teacherService.save1(teacher);
        //9003模拟报错验证全局事务
        //int a=9003/0;
        return true;
    }


//9023的TeacherService接口  需要注解@LocalTCC
@LocalTCC
public interface TeacherService extends IService<Teacher> {

    List<Teacher> selectList();

    //两段式提交
    @TwoPhaseBusinessAction(name = "save1",
            commitMethod = "save1_commit",
            rollbackMethod = "save1_rollback")
    int save1(@BusinessActionContextParameter(paramName = "teacher") Teacher teacher);

    boolean save1_commit(BusinessActionContext actionContext);

    boolean save1_rollback(BusinessActionContext actionContext);
}

//TeacherService接口的实现类 方法
@Service
public class TeacherServiceImpl extends ServiceImpl<TeacherMapper, Teacher>
        implements TeacherService {

    @Autowired
    TeacherMapper teacherMapper;
    private int teacher_id;

    @Override
    public List<Teacher> selectList() {
        return teacherMapper.selectList();
    }

    @Override
    //准备方法
    public int save1(Teacher teacher) {
        int insert = teacherMapper.insert(teacher);
        Integer id = teacher.getId();
        this.teacher_id=id;
        return insert;
    }

    @Override
    //提交方法
    public boolean save1_commit(BusinessActionContext actionContext) {
        System.out.println("=====9023的addTeacher的提交方法");
        return true;
    }

    @Override
    //回滚方法
    public boolean save1_rollback(BusinessActionContext actionContext) {
        System.out.println("=====9023的addTeacher的回滚方法");
        teacherMapper.deleteById(teacher_id);
        return true;
    }


}
5:debug测试因为 断点在9022的int a = 9022 / 0;
http://localhost:9022/add?name=tcc3&address=纽约
在此停顿观察数据库


然后int a = 9022 / 0; 放行后在查询数据库,发现插入的两条数据会回滚,走了各自的回滚方法
这里验证的TCC模式能够保证 分布式事务的一致性。
在int a = 9022 / 0没有放行的时候,我们接着查询9023的数据,回出现读未提交,
所以想要保证安全,防止脏读?
跟AT模式一样这里的读也需要添加select for update,并且加全局注解能保证安全吗?
答案是不能,因为TCC模式是通过手动代码删除或者修改数据的,不能保证脏读。慎重使用TCC,存在业务限制。

6.3:TCC模式的优缺点
缺点:
1:需要自己手写代码的准备,提交,回滚方法,代码耦合度高
2:跟AT模式一样这里的读也需要添加select for update,并且加全局注解能保证安全吗?
答案是不能,因为TCC模式是通过手动代码删除或者修改自己添加和修改的数据,不能保证脏读。慎重使用TCC,存在业务限制。
详述分布式事务Seata TCC空回滚/幂等/悬挂问题、解决方案(seata1.5.1如何解决?)_seata的tcc模式的放悬挂-CSDN博客
优点:
TCC 模式是 Seata 支持的一种由业务方细粒度控制的侵入式分布式事务解决方案,是继 AT 模式后第二种支持的事务模式,最早由蚂蚁金服贡献。其分布式事务模型直接作用于服务层,不依赖底层数据库,可以灵活选择业务资源的锁定粒度,减少资源锁持有时间,可扩展性好,可以说是为独立部署的 SOA 服务而设计的。
6.4:TCC的空回滚
1:TCC的原理
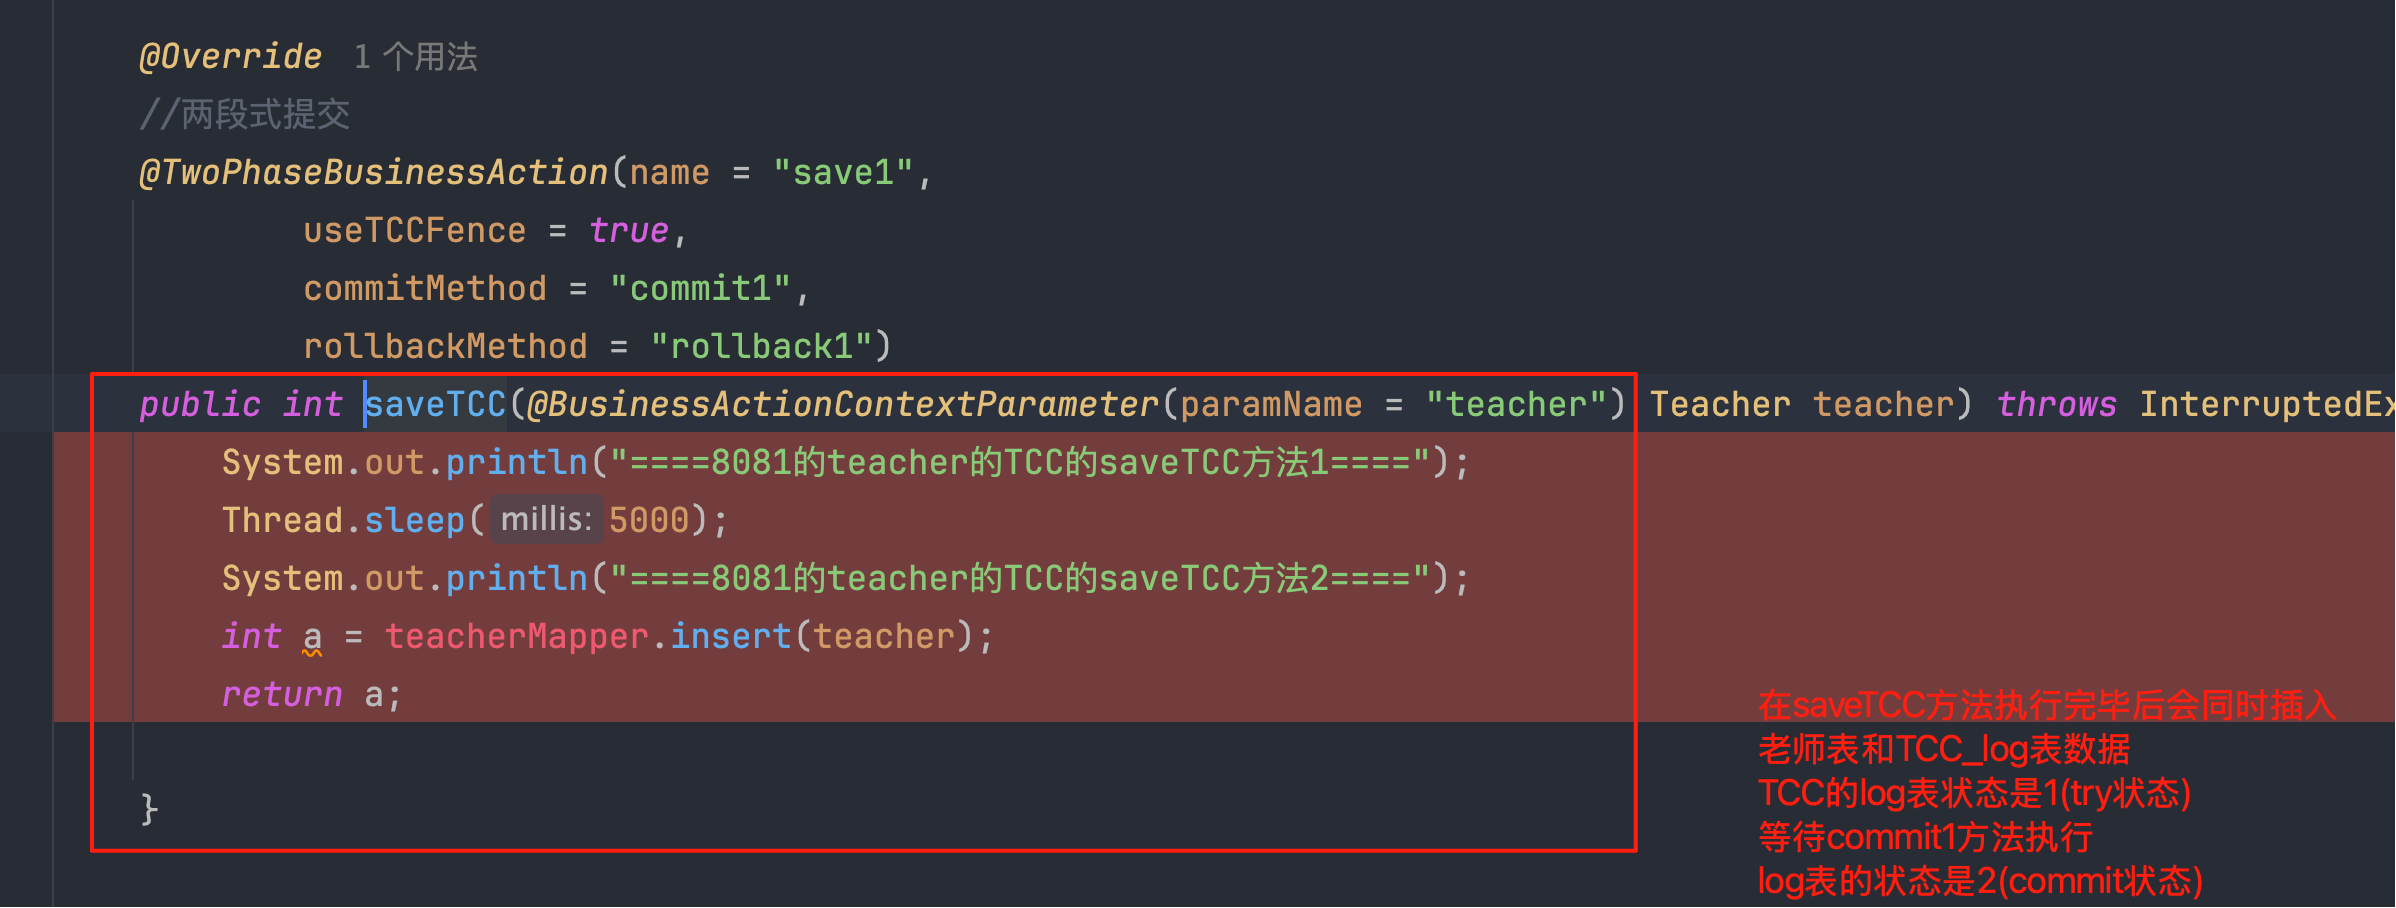
注解的两段式提交方法执行完毕,在会同时插入日志表和业务表,日志指标状态1(try状态)
当没有无异常的时候,执行commit方法,日志表状态设置成2(commit状态)
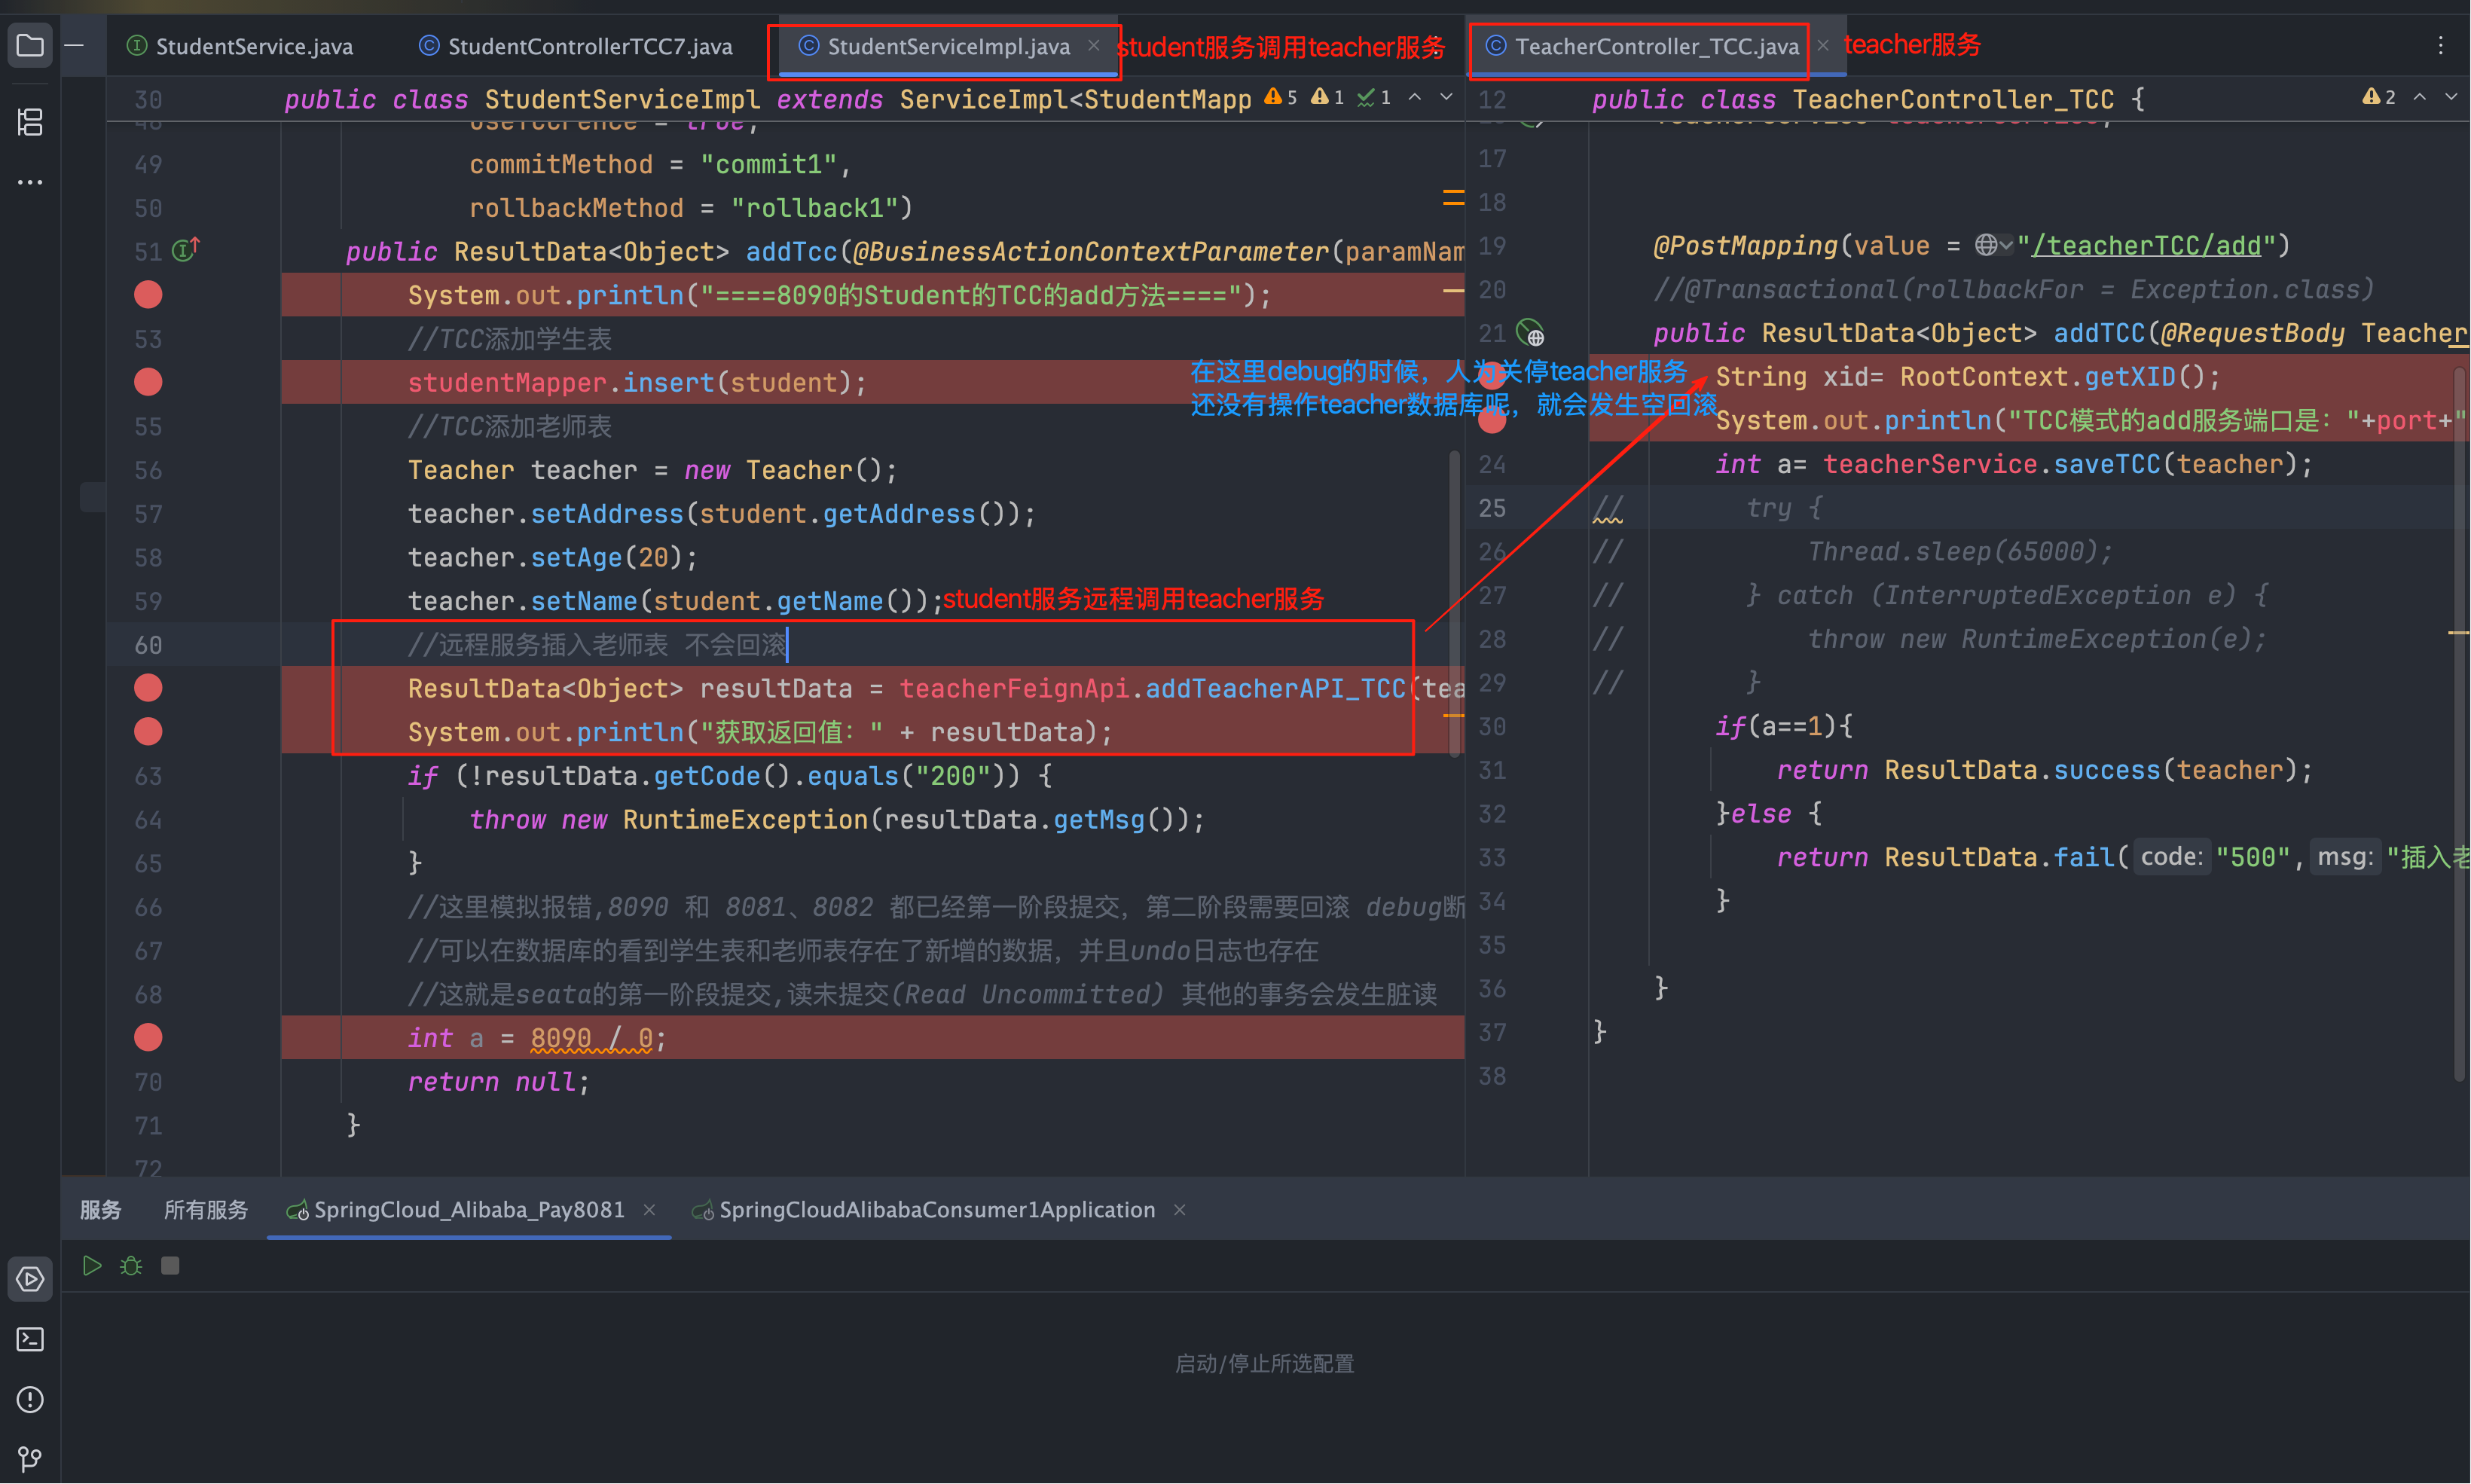
2:什么是TCC的空回滚
Try未执行,但是cancel执行了
业务案例:student服务调用teacher服务,student服务开启了全局事务操作了学生表注册了student的分支事务,调用teacher服务注册了分支事务但是teacher服务正在操作数据库之前发生了宕机或者卡顿teacher服务没有实际操作数据库,这个时候发生了Teacher服务回滚,这就是典型的空回滚
代码实例截图
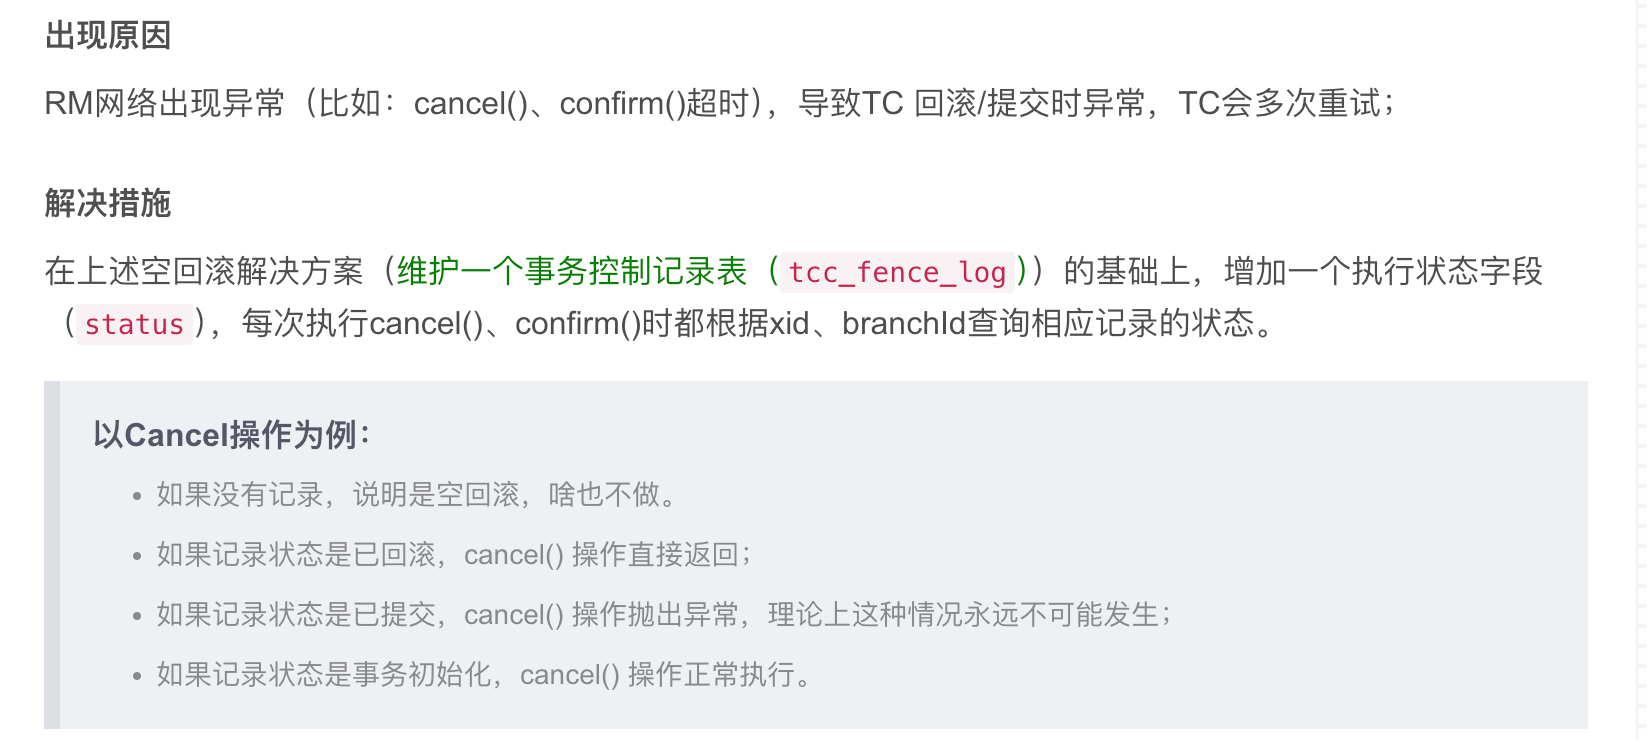
3:TCC的空回滚如何解决
插入一个fen_log表,然后注解开启,tcc_fence_log的status的状态值1(try状态)、2(commit状态)、3(rockback状态)、4(suspended暂停状态)
CREATE TABLE IF NOT EXISTS `tcc_fence_log`
(
    `xid`           VARCHAR(128)  NOT NULL COMMENT 'global id',
    `branch_id`     BIGINT        NOT NULL COMMENT 'branch id',
    `action_name`   VARCHAR(64)   NOT NULL COMMENT 'action name',
    `status`        TINYINT       NOT NULL COMMENT 'status(tried:1;committed:2;rollbacked:3;suspended:4)',
    `gmt_create`    DATETIME(3)   NOT NULL COMMENT 'create time',
    `gmt_modified`  DATETIME(3)   NOT NULL COMMENT 'update time',
    PRIMARY KEY (`xid`, `branch_id`),
    KEY `idx_gmt_modified` (`gmt_modified`),
    KEY `idx_status` (`status`)
) ENGINE = InnoDB
DEFAULT CHARSET = utf8mb4;当发生空悬的时候结合6.4的业务案例,Teacher宕机,但是业务数据没有提交执行,那么在日志表中就不会记录这个时候查询不到分支事务,记录不存在就是是空回滚,什么都不操作,这就log表的作用
6.5:幂等
在tcc中可能发生多次的提交或者回滚,当TC给rm发送提交或者回滚指令的时候,rm可能收到了新消息正在操作但是发生了卡顿,TC就会多次重复发送提交或者回滚指令,但是出现了多次提交或者回滚。导致数据不一致,这个就是幂等问题。
同样是日志表解决,在日志表的status状态值记录状态,根据状态来操作。
也就是说只需要根据status的值来操作,只会修改一次,就能避免重试带来的幂等性问题
更多推荐
 0
0 0
0- 0


 已为社区贡献1条内容

所有评论(0)