
SpringCloudConfig:分布式配置中心
SpringCloudConfig分布式配置中心:概念、核心价值、架构与原理、使用
目录
一、概念
1.1 概念
Spring Cloud Config 是一个为分布式系统提供外部化配置支持的配置管理框架。通俗来讲,它是一个“配置中心”,专门用来统一管理所有微服务应用程序的配置文件(如 application.yml, application.properties),并为它们提供集中式的、动态的配置服务。
核心思想:集中化、统一地管理所有微服务应用程序在不同环境(开发、测试、生产等)下的配置信息。
解决的问题:
-
配置管理混乱:成百上千个配置文件,修改一个配置需要逐个服务去找,极易出错。
-
环境隔离困难:为不同环境(dev, test, prod)维护不同的配置非常繁琐。
-
配置动态更新:修改配置后,需要重启服务才能生效,这对于生产环境是不可接受的。
-
安全性问题:敏感信息(如密码)以明文形式写在代码或配置文件中,存在泄露风险。
1.2 核心价值
-
集中化管理 (Centralized Management):
-
痛点:成百上千个微服务,每个都有各自的配置文件,散落在各个节点上。修改一个公共配置(如数据库地址)需要逐个服务去修改、重启,效率低下且极易出错。
-
价值:将所有配置集中在一个地方(如 Git 仓库、SCN、Vault、JDBC),实现“一处修改,处处生效”。管理、审计、版本控制都变得极其方便。
-
-
环境隔离 (Environment Separation):
-
痛点:开发、测试、生产环境的配置混合在一起,容易发生误用。
-
价值:通过简单的配置(如
spring.profiles.active=prod)即可为不同环境加载完全不同的配置,严格隔离环境,避免人为失误。
-
-
动态刷新 (Dynamic Refresh):
-
痛点:修改配置后必须重启应用才能生效,导致服务中断。
-
价值:结合 Spring Cloud Bus(消息总线),可以实现应用配置的动态刷新。修改 Git 仓库配置后,通过向 Bus 发送一个
/actuator/refresh或/actuator/bus-refresh请求,即可让所有相关服务不重启的情况下拉取最新配置。这是其最强大的能力之一。
-
-
版本控制与审计 (Version Control & Audit):
-
价值:由于配置存储在 Git 等版本控制系统中,所有的配置变更都有完整的提交历史记录。可以清晰地追踪“谁、在什么时间、为什么”修改了配置,方便回滚和审计。
-
-
加密与解密 (Encryption & Decryption):
-
价值:提供对敏感配置(如密码、密钥)的加密解密功能。配置文件中可以用
{cipher}...密文存储敏感信息,Config Server 在返回给 Client 前会对其进行解密,提高了安全性。
-
1.3 能力边界
-
它不是服务发现组件:
-
Config Server 负责管理配置,但不负责服务的注册与发现。那是 Eureka 或 Nacos 等组件的职责。通常,Config Server 的地址需要在 Client 的
bootstrap.yml中直接配置。
-
-
动态刷新能力有限:
-
虽然支持动态刷新,但默认是通过 Client 端的
@RefreshScope注解实现的,它只适用于标注了该注解的 Bean(通常是通过@Value注入配置的Bean)。 -
对于
@ConfigurationProperties注解的 Bean,动态刷新支持得更好。 -
对于一些在应用启动时就已经确定的配置(如数据库连接池的大小、服务器端口等),动态刷新可能无效或需要特殊处理。
-
-
它不持久化客户端状态:
-
Config Server 是无状态的,它本身不存储任何客户端的状态信息,它只是一个从仓库读取配置并对外提供接口的中间层。
-
-
高可用依赖外部组件:
-
Config Server 的高可用需要自行实现,通常是通过部署多个实例,并用负载均衡器(如 Nginx)或将其注册到 Eureka 来实现。其配置仓库(如 Git)的高可用也需要单独保障。
-
简单模式:部署多个 Config Server 实例,指向同一个 Git 仓库。然后通过负载均衡器(如 Nginx)对外提供一个统一的访问地址,Client 配置的是负载均衡器的地址。
-
服务发现模式:将 Config Server 自身注册到 Eureka 或 Consul 等注册中心。Config Client 也连接注册中心,通过服务名(如
config-server)来发现可用的 Config Server 实例。这是更“云原生”的做法。
-
-
不是实时推送:
-
配置变更后,需要手动触发
/refresh端点或依靠 Git 的 Webhook 自动触发,不是服务端主动的实时推送。这中间会有短暂的延迟。
-
1.4 应用场景
-
大型微服务生态系统:
-
当微服务数量非常多(几十个以上)时,集中式配置管理的优势会变得极其明显,能够大幅降低运维复杂度。
-
-
多环境部署需求:
-
项目需要同时部署在开发、测试、预发布、生产等多个环境中,且每个环境的配置(如数据源、第三方API密钥)差异很大。
-
-
配置频繁变更且要求不重启服务:
-
对于一些业务开关、功能降级、流量控制等需要频繁调整并立即生效的配置,结合 Spring Cloud Bus 可以完美满足需求。
-
-
对配置安全性和审计有要求:
-
在金融、政府等对安全合规要求较高的行业,配置的版本历史、变更追踪是刚需,Config Server 与 Git 的集成了天然地满足了这一需求。
-
-
混合云或多云部署:
-
服务可能部署在不同的云平台或私有云上,但都需要使用同一份中心化的配置,Config Server 提供了一个统一的配置入口。
-
1.5 与Nacos对比
| 特性 | Spring Cloud Config | Nacos |
|---|---|---|
| 核心功能 | 纯配置中心 | 服务发现 + 配置中心 |
| 配置格式 | 支持 YAML, Properties, JSON 等 | 支持 YAML, Properties, JSON 等 |
| 动态刷新 | 支持(需配合 Bus) | 原生支持,效率更高 |
| 管理界面 | 无(需自行开发或借助 Git) | 提供功能丰富的控制台 |
| 性能与一致性 | 依赖 Git,大规模部署时可能有性能瓶颈 | 内置分布式协议,性能和一致性更好 |
| 生态系统 | Spring Cloud 原生,与 Spring 项目无缝集成 | 阿里开源,对 Spring Cloud 兼容性好 |
技术选择:
-
如果项目是纯粹的 Spring Cloud 技术栈,且已经采用了 Eureka 等服务发现组件,那么 Spring Cloud Config 是一个稳健的选择。
-
如果是新项目选型,或者希望用一个组件同时解决服务发现和配置管理问题,并追求更强大的功能和更简单的运维,那么 Nacos 通常是更推荐的方案。
二、架构与原理
2.1 架构
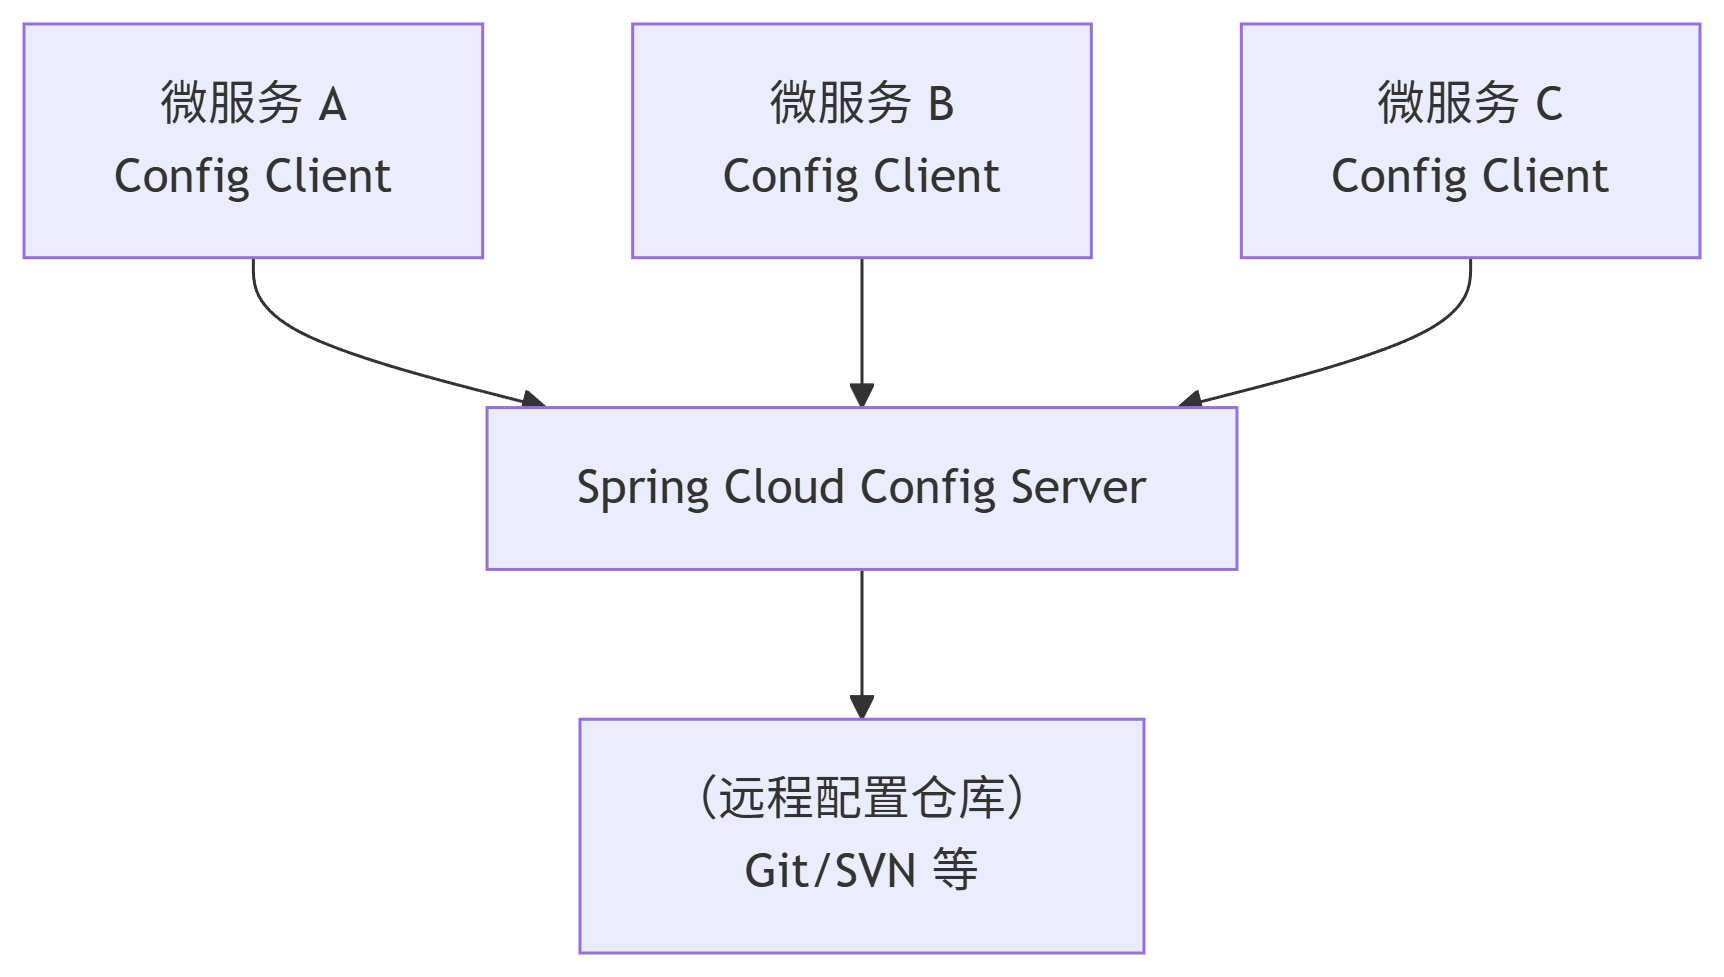
Spring Cloud Config 的架构主要由三个角色构成:
-
远程配置仓库(Remote Config Repository):
-
作用:这是配置信息的唯一真相源(Single Source of Truth)。所有应用的配置都集中存储在这里。
-
常用实现:Git(如 GitHub、GitLab、Gitee)、SVN、本地文件系统或 Vault(用于存储敏感信息)。Git 是最常用和推荐的方式,因为它天然支持版本控制、分支管理,便于审计和回滚。
-
-
配置服务端(Config Server):
-
作用:一个独立的微服务,它的唯一职责就是与远程配置仓库交互。它暴露 HTTP API(如
/{application}/{profile}[/{label}]和/ {application}-{profile}.yml等),客户端通过这些接口来获取配置。 -
功能:从远程仓库拉取配置、缓存配置、加密/解密敏感信息、提供 RESTful 接口。服务端本身不存储配置,只是一个中间代理。
-
-
配置客户端(Config Client):
-
作用:集成在各个微服务应用中的组件。在应用启动时(或特定时机),它会主动向 Config Server 发起请求,获取自己所需的配置信息,然后用这些配置来初始化应用的应用上下文(ApplicationContext)。
-
位置:通常作为微服务的一个依赖(如
spring-cloud-starter-config)引入。 -
实现:只需在项目中引入
spring-cloud-starter-config依赖,并在bootstrap.properties(或bootstrap.yml) 文件中配置 Config Server 的地址和应用信息即可。bootstrap.properties优先级高于application.properties,用于配置应用启动阶段的关键信息。可以通过启动多个 Config Server 实例并让 Client 配置多个spring.cloud.config.uri(逗号分隔)来实现高可用。
-
# bootstrap.properties
spring.application.name=user-service # 告诉ConfigServer“我是谁”
spring.cloud.config.profile=prod     # 告诉ConfigServer“我要哪个环境的配置”
spring.cloud.config.label=main       # 告诉ConfigServer“我要Git的哪个分支”
spring.cloud.config.uri=http://localhost:8888 # Config Server的地址
2.2 工作流程简述
-
开发者将配置文件推送到 Git 仓库(例如,为不同应用、不同环境创建
app1-dev.yml,app2-prod.yml等)。 -
Config Server 启动,并绑定到该 Git 仓库。
-
业务微服务(Config Client)启动时,根据自身的
application.name和profiles.active(如app1,dev),向 Config Server 发起请求。 -
Config Server 根据请求的应用名和环境,从 Git 仓库查找对应的配置文件,并将其返回给 Client。
-
Client 获取到配置后,完成启动。
2.3 工作原理
整个过程可以分为两个主要阶段:启动阶段和运行时阶段。
阶段一:应用启动/bootstrap 阶段
这是最关键的阶段,决定了客户端如何获取到初始配置。
-
客户端启动:当一个集成了 Config Client 的微服务应用启动时,由于
spring-cloud-starter-config依赖的存在,它会先创建一个 “bootstrap 上下文”。 -
读取本地配置:这个 bootstrap 上下文会从本地的
bootstrap.properties或bootstrap.yml文件中读取最基础的配置。这些配置通常只包含:-
spring.application.name:当前应用的名称(必填,用于匹配远程配置的{application}部分)。 -
spring.cloud.config.profile:当前激活的环境 profile(如dev,test,prod,用于匹配{profile}部分)。如果不配置,默认为default。 -
spring.cloud.config.label:指定远程仓库的分支(branch)、标签(tag)或提交ID(用于匹配{label}部分)。如果不配置,默认为master或main。 -
spring.cloud.config.uri:Config Server 的地址(例如http://localhost:8888)。
-
-
请求配置服务端:bootstrap 上下文利用上一步获取的地址,向 Config Server 发起 HTTP 请求。请求的 URL 格式通常为:
/{application}/{profile}[/{label}]。例如,一个名为order-service的应用,在dev环境,请求main分支的配置,会请求:http://config-server:8888/order-service/dev/main。 -
服务端响应:Config Server 接收到请求后:
-
根据
{application},{profile},{label}参数,去远程配置仓库(如 Git)查找对应的配置文件。 -
配置文件的命名规则是:
{application}-{profile}.yml或{application}-{profile}.properties。例如,它会查找order-service-dev.yml。 -
服务端将找到的配置内容组装成 JSON 格式(或指定的格式)返回给客户端。响应体中包含了配置的所有键值对信息,以及配置的来源(label,profile等)信息。
-
-
客户端初始化:Config Client 拿到服务端返回的配置后,用这些配置来初始化主应用上下文。此时,应用程序中通过
@Value注解或@ConfigurationProperties绑定的属性都被注入成功。 -
应用正式启动:主应用上下文初始化完成,应用启动完毕。此时,应用的行为完全由从 Config Server 获取到的集中式配置所控制。
关键点:
bootstrap.properties的加载优先级远高于application.properties。它是为了获取外部配置而存在的“引导”文件。
阶段二:运行时/动态刷新阶段
在传统的启动时加载配置的模式下,修改配置后必须重启客户端应用才能生效,这在生产环境是不可接受的。因此,Spring Cloud Config 提供了动态刷新机制。
-
暴露刷新端点:在需要动态刷新的 Config Client 应用中,添加
@RefreshScope注解(通常标注在@Configuration或@Bean上),并引入spring-boot-starter-actuator依赖。这会暴露一个/actuator/refresh的 HTTP POST 端点。 -
修改配置:运维人员在 Git 仓库中修改配置文件并提交。
-
通知变更:注意:Config Server 不会主动推送配置变更。需要以下两种方式之一来触发客户端刷新:
-
手动刷新:调用客户端的
/actuator/refresh端点。这会强制该客户端重新请求 Config Server,获取最新配置,并刷新所有@RefreshScope注解下的 Bean。 -
自动刷新(结合 Spring Cloud Bus):这是更优雅的解决方案。引入消息代理(如 RabbitMQ, Kafka)。当配置更新后,通过向 Config Server 发送
/actuator/bus-refresh请求,Config Server 会通过 Spring Cloud Bus 向所有连接到消息总线的客户端发送一个刷新事件。所有客户端监听此事件并自动完成刷新,实现一次通知,全部更新。
-
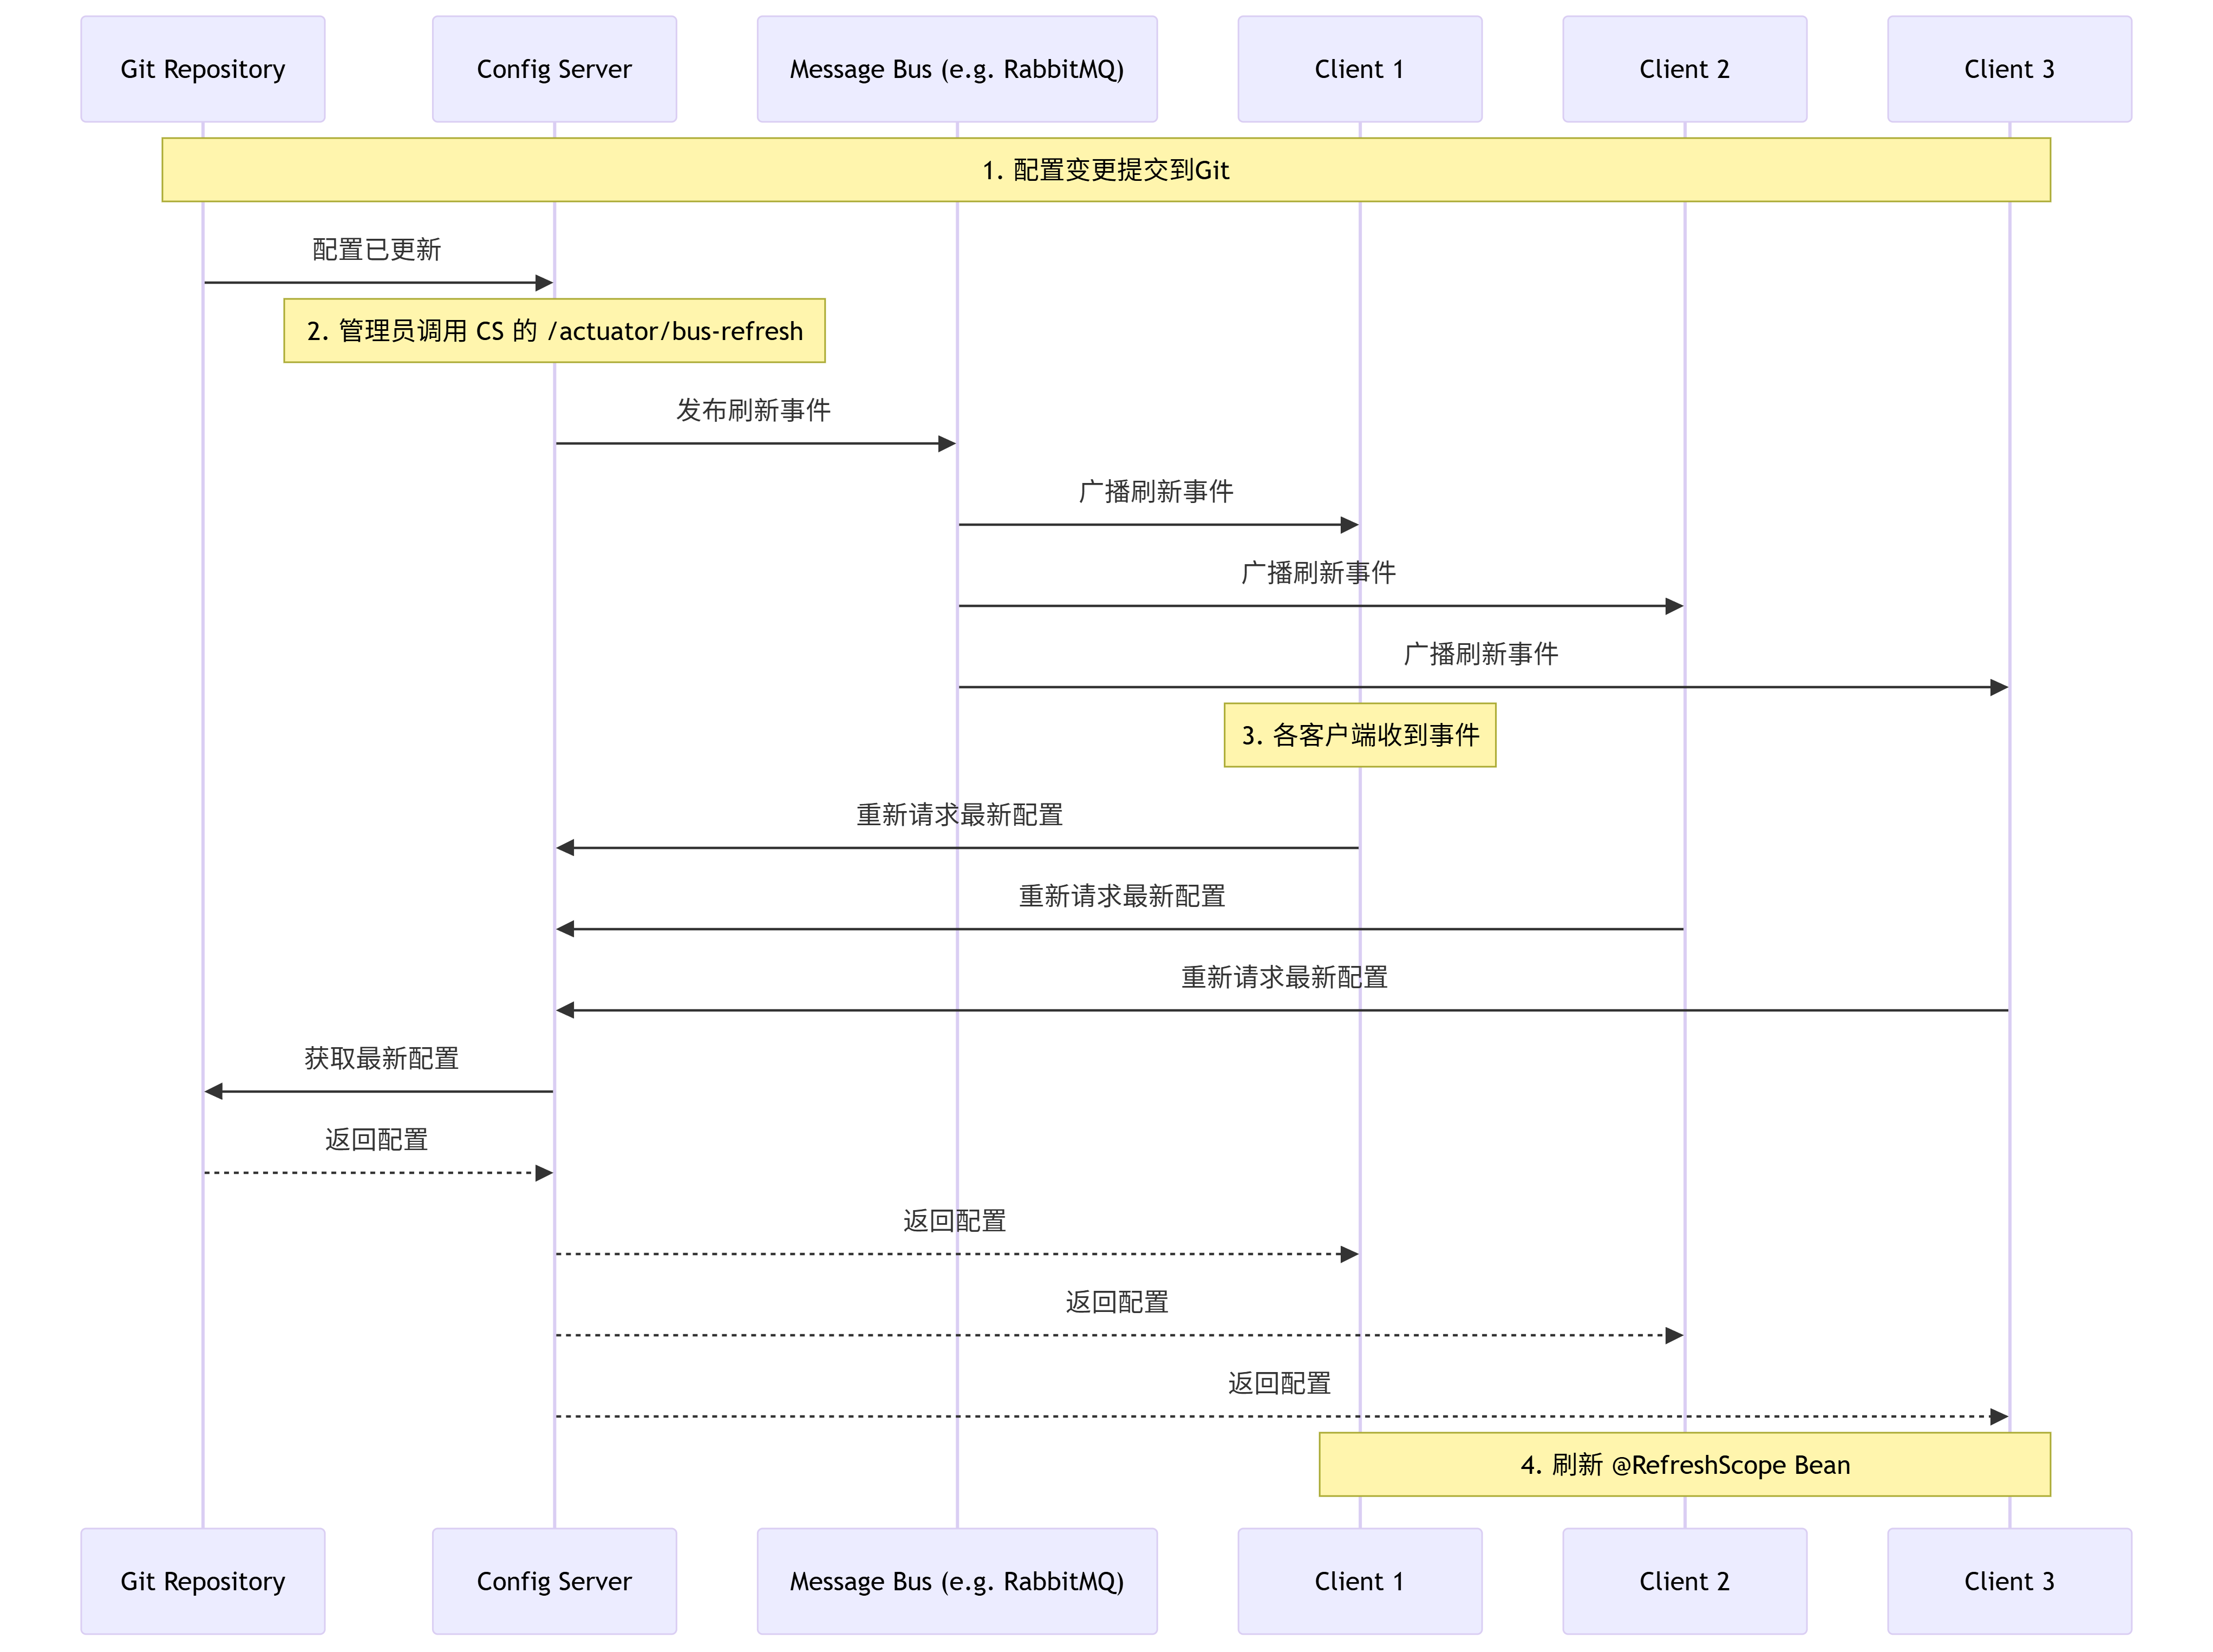
2.4 配置文件的匹配规则
Config Server 在查找配置时,遵循一个非常灵活的叠加(Overlay)和合并(Merge) 策略。它会查找多个相关的配置文件并将它们合并。优先级从低到高如下:
-
application.yml(所有应用共享的默认配置) -
{application}.yml(指定应用名的配置) -
application-{profile}.yml(某个环境的所有应用共享配置) -
{application}-{profile}.yml(指定应用在指定环境的配置,优先级最高)
例如:对于 order-service 应用和 prod 环境,Config Server 会尝试查找并合并以下四个文件(如果存在的话):
-
application.yml(共享基础配置) -
order-service.yml(order-service 的默认配置) -
application-prod.yml(所有生产环境应用的配置) -
order-service-prod.yml(order-service 的生产环境专属配置,优先级最高)
高优先级配置中的属性会覆盖低优先级配置中的相同属性。
Config Server 根据客户端发来的应用名(
name)、环境(profile)和分支(label)三个参数,去仓库中查找对应的配置文件。查找规则如下:
它会尝试匹配
{application}-{profile}.yml或{application}-{profile}.properties。如果没找到,则会回退到匹配
{application}.yml或{application}.properties。例如,一个名为
user-service的应用,在prod环境下,会尝试查找user-service-prod.yml->user-service.yml。
2.5 安全与加密
对于数据库密码、API密钥等敏感信息,直接明文存储在 Git 中是非常危险的。Spring Cloud Config 提供了加密解密功能。
-
加密:在配置文件中,可以使用
{cipher}前缀来表示加密值。例如:password: '{cipher}FKSAJDFGYI8UF7AGYASDFAS...'。 -
加解密端点:Config Server 提供了
/encrypt和/decrypt端点(默认关闭,需要配置encrypt.key或使用 Keystore 才能开启)。 -
流程:运维人员通过
/encrypt端点将明文加密得到密文,然后将密文写入配置文件。Config Client 获取到加密的配置后,Config Server 会在传输前后自动对其进行解密(如果客户端请求中包含有效的认证信息),或者客户端本地解密(需配置密钥)。 -
配置:为 Config Server 添加安全依赖(如
spring-boot-starter-security)并配置用户名密码后,Client 端配置spring.cloud.config.uri时需包含凭证,格式为:http://{username}:{password}@host:port。
三、使用
3.1 搭建步骤
搭建一个最简单的可工作模型,包含:
-
一个 Git 仓库(以 Gitee/Github 为例,也可以用本地文件系统)。
-
一个 Config Server(配置中心服务端)。
-
一个 Config Client(配置中心客户端),它会从 Server 拉取配置。
3.1.1 准备配置仓库
首先需要在版本控制工具(如 Git)上创建一个仓库,用于存放配置文件。
-
在 Gitee 或 Github 上创建一个新的公开仓库,例如名为
spring-cloud-config-repo。 -
在仓库中创建几个配置文件,为了模拟不同环境,这里创建三个文件:
命名规则:
{application-name}-{profile}.yml或{application-name}-{profile}.properties-
config-client-dev.yml(开发环境) -
config-client-test.yml(测试环境) -
config-client-prod.yml(生产环境)
-
-
为每个文件添加一些简单配置。例如,在
config-client-dev.yml中写入:
# config-client-dev.yml
my:
  config:
    message: "Hello from Git DEV config!"
    info: "This is a development environment."
server:
  port: 8081 # 为了测试,让客户端也启动在8081,避免冲突
在 config-client-prod.yml 中写入:
# config-client-prod.yml
my:
  config:
    message: "Hello from Git PROD config!"
    info: "This is a production environment."
server:
port: 8082-
提交并推送到远程仓库。记住仓库地址,例如:
https://gitee.com/your-username/spring-cloud-config-repo.git
3.1.2 创建 Config Server
使用 Spring Initializr 来快速生成项目。
-
创建项目:
-
Project: Maven
-
Language: Java
-
Spring Boot: 选择最新的稳定版(如 3.2.5)
-
Group:
com.example -
Artifact:
config-server -
Dependencies: 搜索并添加
Config Server和Actuator(Actuator 用于健康检查等)。
-
-
启用 Config Server:
在生成的项目主类上添加
@EnableConfigServer注解。
// src/main/java/com/example/configserver/ConfigServerApplication.java
package com.example.configserver;

import org.springframework.boot.SpringApplication;
import org.springframework.boot.autoconfigure.SpringBootApplication;
import org.springframework.cloud.config.server.EnableConfigServer;

@SpringBootApplication
@EnableConfigServer // 启用配置中心服务端功能
public class ConfigServerApplication {
    public static void main(String[] args) {
        SpringApplication.run(ConfigServerApplication.class, args);
    }
}- 配置 Server:
修改 application.properties 文件,指定 Git 仓库地址。
# src/main/resources/application.properties
server.port=8888 # Config Server 默认端口是8888

spring.application.name=config-server

# 配置 Git 仓库地址
spring.cloud.config.server.git.uri=https://gitee.com/your-username/spring-cloud-config-repo.git

# 如果仓库是公开的,不需要用户名密码;如果是私有的,需要配置
# spring.cloud.config.server.git.username=your-username
# spring.cloud.config.server.git.password=your-password

# 可选:指定仓库的分支,默认为 main 或 master
spring.cloud.config.server.git.default-label=main
如果配置文件不在仓库根目录,可以在 Server 端配置搜索路径:
spring.cloud.config.server.git.search-paths=config-files,another-dir/*.yml-
启动并测试 Server:
运行
ConfigServerApplication的 main 方法。
在浏览器中访问http://localhost:8888/config-client/dev。
会看到一个 JSON 格式的响应,其中包含了你在 Git 上创建的config-client-dev.yml文件的内容。这证明 Config Server 已经从 Git 拉取配置并可以通过 HTTP 访问了。URL 路径格式解释:
/{application}/{profile}[/{label}]也可以试试其他端点:
-
application:客户端的应用名,对应配置文件中的{application-name}部分,这里是config-client。 -
profile:对应的环境,如dev,test,prod。 -
label:Git 的分支(branch),可选,默认为main或master。 -
http://localhost:8888/config-client/prod -
http://localhost:8888/config-client/test
-
3.1.3 创建 Config Client
现在创建一个普通的 Spring Boot 应用,作为从 Config Server 获取配置的客户端。
-
创建项目:
-
Project: Maven
-
Language: Java
-
Spring Boot: 与 Server 版本一致
-
Group:
com.example -
Artifact:
config-client -
Dependencies: 搜索并添加
Config Client和Web(用于创建简单的Controller测试)。
-
-
配置 Client:
客户端的配置比较特殊。它需要在获取到远程配置之前就知道 Config Server 的地址。因此,这个配置不能放在
application.properties里,而要放在bootstrap.properties(或bootstrap.yml)中。bootstrap.yml的加载优先级比application.yml更高,它用于配置应用启动时的引导上下文。创建/修改
src/main/resources/bootstrap.properties:
# src/main/resources/bootstrap.properties
# 指定应用名称,这个名称必须与远程配置文件中的 {application} 部分一致!
spring.application.name=config-client

# 指定激活的环境,这将决定拉取哪个 profile 的配置
spring.profiles.active=dev

# 告诉客户端配置中心的位置
spring.cloud.config.uri=http://localhost:8888- 创建一个 Controller 来测试配置:
// src/main/java/com/example/configclient/ConfigClientController.java
package com.example.configclient;

import org.springframework.beans.factory.annotation.Value;
import org.springframework.web.bind.annotation.GetMapping;
import org.springframework.web.bind.annotation.RestController;

@RestController
public class ConfigClientController {

    // 注入远程配置中的属性
    @Value("${my.config.message:Default message...}") // 冒号后面是默认值,如果获取失败则使用默认值
    private String message;

    @Value("${my.config.info}")
    private String info;

    @GetMapping("/message")
    public String getMessage() {
        return "Message from Config Server: " + message + ", Info: " + info;
    }
}- 启动并测试 Client:
首先确保 Config Server 正在运行(端口 8888)。
然后运行 ConfigClientApplication 的 main 方法。
观察客户端启动日志,会看到类似这样的信息,表明它正在从 Config Server 拉取配置:Fetching config from server at : http://localhost:8888
在浏览器中访问 http://localhost:8081/message(因为在 dev 配置中我们指定了 server.port=8081)。
应该能看到返回的消息:"Message from Config Server: Hello from Git DEV config!, Info: This is a development environment."
测试切换环境:
-
停止客户端应用。
-
修改
bootstrap.properties中的spring.profiles.active=prod。 -
重新启动客户端应用。
-
此时客户端会从 Config Server 拉取
config-client-prod.yml的配置,并监听在 8082 端口。 -
访问
http://localhost:8082/message,会看到生产环境的配置信息。
3.2 配置动态刷新(无需重启服务)
在 Client 端添加 actuator 依赖(如果创建时没加,现在在 pom.xml 里加上)。
<dependency>
    <groupId>org.springframework.boot</groupId>
    <artifactId>spring-boot-starter-actuator</artifactId>
</dependency>
在 Client 的 bootstrap.properties 中暴露 refresh 端点:
# 暴露 actuator 端点,包括 refresh
management.endpoints.web.exposure.include=refresh,health,info
在需要刷值的 Bean 上添加 @RefreshScope 注解:
import org.springframework.cloud.context.config.annotation.RefreshScope;

@RestController
@RefreshScope // 添加此注解
public class ConfigClientController {
    // ...
}流程:
-
修改 Git 配置并提交。
-
手动向 Client 发送一个 POST 请求:
curl -X POST http://localhost:8081/actuator/refresh -
这个请求会刷新所有带有
@RefreshScope注解的 Bean,下次再调用/message接口时,就能获取到最新的配置值。
注意:这只是半自动的。全自动的动态刷新需要与 Spring Cloud Bus(消息总线)结合使用,通过广播消息通知所有客户端刷新。
与 Spring Cloud Bus 集成实现全局刷新:Spring Cloud Bus 使用轻量级消息代理(如 RabbitMQ, Kafka)连接分布式系统的节点,可以用于广播状态更改(如配置更新)。工作流程:
-
修改 Git 配置并提交。
-
向 任意一个 客户端发送 POST 请求:
/actuator/busrefresh。 -
该客户端通过消息总线将刷新事件广播出去。
-
所有监听该总线的其他客户端都会收到消息,并自动完成各自的刷新。
-
这样就实现了一次请求,全部更新的效果。
3.3 配置详解
| 配置类别 | 配置项 | 说明 | 默认值 | 示例/可选值 |
|---|---|---|---|---|
| 📋 Config Server 核心配置 | server.port |
Config Server 服务端口 | 8888 | 8888 |
| 🔧 Git 仓库配置 | spring.cloud.config.server.git.uri |
Git 仓库地址 | 无 | https://github.com/your-repo.git |
spring.cloud.config.server.git.username |
访问 Git 仓库的用户名 | 无 | your-username |
|
spring.cloud.config.server.git.password |
访问 Git 仓库的密码 | 无 | your-password |
|
spring.cloud.config.server.git.default-label |
默认分支 | master |
main, dev |
|
spring.cloud.config.server.git.search-paths |
相对搜索路径,可配置多个 | 根目录 | '{application}', subdir/config |
|
spring.cloud.config.server.git.basedir |
本地缓存目录 | 系统临时目录 | /tmp/config-repo |
|
spring.cloud.config.server.git.force-pull |
强制拉取远程配置覆盖本地 | false |
true |
|
spring.cloud.config.server.git.refresh-rate |
定期刷新配置的间隔(秒) | 0 (每次请求刷新) |
30 |
|
spring.cloud.config.server.git.clone-on-start |
启动时是否克隆完整仓库 | false |
true |
|
| 📁 本地文件配置 | spring.profiles.active |
设置 Config Server 使用本地文件 | 无 | native |
spring.cloud.config.server.native.searchLocations |
本地文件系统搜索路径 | 无 | file:/path/to/config |
|
| 📋 Config Client 核心配置 | spring.cloud.config.uri |
Config Server 的地址 | 无 | http://localhost:8888 |
spring.cloud.config.fail-fast |
是否启用快速失败(启动时连不上则报错) | false |
true |
|
spring.cloud.config.retry.initial-interval |
初始重试间隔(启用 fail-fast 时) | 1000ms | 2000ms |
|
spring.cloud.config.retry.max-attempts |
最大重试次数(启用 fail-fast 时) | 6 | 10 |
|
| 🔍 定位配置 | spring.application.name |
应用名称,对应 {application} |
无 | my-app |
spring.cloud.config.profile |
环境 profile,对应 {profile} |
无 | dev, test, prod |
|
spring.cloud.config.label |
Git 分支/标签,对应 {label} |
master |
dev-branch, v1.0 |
|
| 🤝 服务发现集成 | spring.cloud.config.discovery.enabled |
是否通过服务发现查找 Config Server | false |
true |
spring.cloud.config.discovery.service-id |
Config Server 注册的服务名 | 无 | config-server |
|
| 🔄 动态刷新 | management.endpoints.web.exposure.include |
暴露的 actuator 端点 | info, health |
*, refresh |
management.security.enabled |
是否启用安全管理(Spring Boot 1.x) | true |
false (不推荐生产) |
更多推荐

 16
16 0
0- 0


 已为社区贡献1条内容

所有评论(0)