
Spring Boot + MinIO 电子文档管理系统分布式存储实战
本文详细介绍了如何基于 Spring Boot 和 MinIO 分布式对象存储构建一个高可用、安全可靠的企业内部电子文档管理系统。内容涵盖从 MinIO 集群部署、Spring Boot 项目搭建、数据库设计、核心代码实现,到系统监控、API 测试与高级功能扩展的全流程实战指南。
·
肖哥弹架构 跟大家“弹弹” Minio 设计与实战应用,需要代码关注
欢迎 点赞,点赞,点赞。
关注公号Solomon肖哥弹架构获取更多精彩内容
历史热点文章
- MyCat应用实战:分布式数据库中间件的实践与优化(篇幅一)
- 图解深度剖析:MyCat 架构设计与组件协同 (篇幅二)
- 一个项目代码讲清楚DO/PO/BO/AO/E/DTO/DAO/ POJO/VO
- 写代码总被Dis:5个项目案例带你掌握SOLID技巧,代码有架构风格
- 里氏替换原则在金融交易系统中的实践,再不懂你咬我
本文详细介绍了如何基于 Spring Boot 和 MinIO 分布式对象存储构建一个高可用、安全可靠的企业内部电子文档管理系统。内容涵盖从 MinIO 集群部署、Spring Boot 项目搭建、数据库设计、核心代码实现,到系统监控、API 测试与高级功能扩展的全流程实战指南。
📋 一、项目概述
1. 业务背景
公司需要开发一个内部电子文档管理系统,用于存储和管理公司的各类文档(合同、报告、设计稿等)。要求实现文档的安全存储、分类管理、权限控制和在线预览等功能。
2. 技术架构图
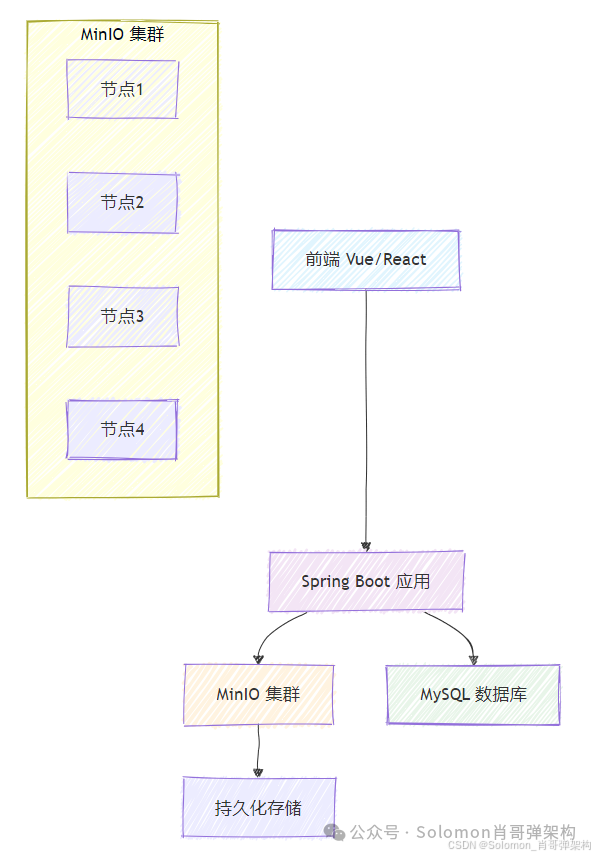
🚀 二、 环境准备
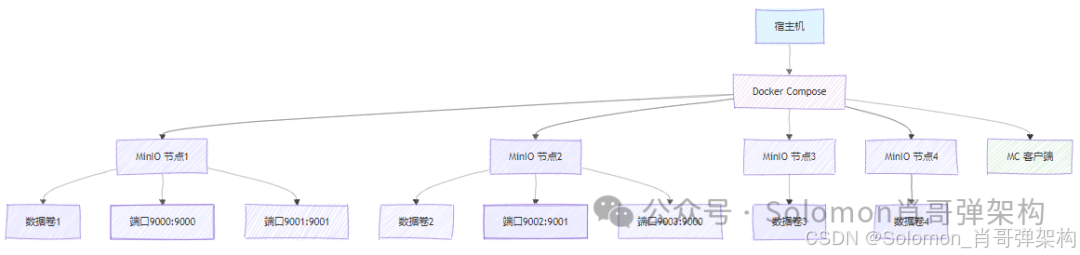
1. MinIO 分布式集群部署
# 创建集群目录结构(在 /opt/minio-cluster 目录下执行)
mkdir -p /opt/minio-cluster/node{1..4}/data
cd /opt/minio-cluster

# 创建 docker-compose.yml 文件
cat > docker-compose.yml << 'EOF'
version: '3.8'
# 使用 Docker Compose 版本 3.8,支持最新的特性

services:
  # 第一个 MinIO 节点
  minio1:
    image: minio/minio:RELEASE.2023-10-25T06-33-25Z
    # 使用特定版本的 MinIO 镜像,确保版本一致性
    container_name: minio-node1
    # 明确指定容器名称,便于管理
    command: server http://minio1/data http://minio2/data http://minio3/data http://minio4/data --console-address ":9001"
    # server: 启动服务器模式
    # http://minio{1..4}/data: 指定集群中所有节点的访问地址和数据目录
    # --console-address ":9001": 将控制台Web界面绑定到9001端口
    hostname: minio1
    # 设置容器主机名,用于节点间通信
    environment:
      MINIO_ROOT_USER: admin
      # 设置管理员用户名(生产环境应使用更复杂的用户名)
      MINIO_ROOT_PASSWORD: your_strong_password_123
      # 设置管理员密码(生产环境必须使用强密码)
      MINIO_DOMAIN: minio.local
      # (可选)设置自定义域名,用于虚拟主机风格的访问
      MINIO_PROMETHEUS_AUTH_TYPE: public
      # (可选)允许Prometheus无需认证访问指标数据
    volumes:
      - ./node1/data:/data
      # 将宿主机的 ./node1/data 目录挂载到容器的 /data 目录
      # 确保数据持久化,容器重启后数据不会丢失
    networks:
      - minio-cluster
      # 连接到自定义网络
    ports:
      - "9001:9001"
      # 将容器的9001端口映射到宿主机的9001端口(控制台)
      - "9000:9000"
      # 将容器的9000端口映射到宿主机的9000端口(API)
    restart: unless-stopped
    # 重启策略:除非手动停止,否则自动重启
    healthcheck:
      test: ["CMD", "curl", "-f", "http://localhost:9000/minio/health/live"]
      # 健康检查:通过API端点检查节点是否存活
      interval: 30s
      # 每30秒检查一次
      timeout: 10s
      # 超时时间10秒
      retries: 3
      # 重试3次后才标记为不健康

  # 第二个 MinIO 节点(配置与第一个节点类似)
  minio2:
    image: minio/minio:RELEASE.2023-10-25T06-33-25Z
    container_name: minio-node2
    command: server http://minio1/data http://minio2/data http://minio3/data http://minio4/data --console-address ":9001"
    hostname: minio2
    environment:
      MINIO_ROOT_USER: admin
      MINIO_ROOT_PASSWORD: your_strong_password_123
    volumes:
      - ./node2/data:/data
    networks:
      - minio-cluster
    ports:
      - "9002:9001"  # 使用不同的宿主机端口避免冲突
      - "9003:9000"  # 使用不同的宿主机端口避免冲突
    restart: unless-stopped
    healthcheck:
      test: ["CMD", "curl", "-f", "http://localhost:9000/minio/health/live"]
      interval: 30s
      timeout: 10s
      retries: 3

  # 第三个 MinIO 节点
  minio3:
    image: minio/minio:RELEASE.2023-10-25T06-33-25Z
    container_name: minio-node3
    command: server http://minio1/data http://minio2/data http://minio3/data http://minio4/data --console-address ":9001"
    hostname: minio3
    environment:
      MINIO_ROOT_USER: admin
      MINIO_ROOT_PASSWORD: your_strong_password_123
    volumes:
      - ./node3/data:/data
    networks:
      - minio-cluster
    ports:
      - "9004:9001"
      - "9005:9000"
    restart: unless-stopped
    healthcheck:
      test: ["CMD", "curl", "-f", "http://localhost:9000/minio/health/live"]
      interval: 30s
      timeout: 10s
      retries: 3

  # 第四个 MinIO 节点
  minio4:
    image: minio/minio:RELEASE.2023-10-25T06-33-25Z
    container_name: minio-node4
    command: server http://minio1/data http://minio2/data http://minio3/data http://minio4/data --console-address ":9001"
    hostname: minio4
    environment:
      MINIO_ROOT_USER: admin
      MINIO_ROOT_PASSWORD: your_strong_password_123
    volumes:
      - ./node4/data:/data
    networks:
      - minio-cluster
    ports:
      - "9006:9001"
      - "9007:9000"
    restart: unless-stopped
    healthcheck:
      test: ["CMD", "curl", "-f", "http://localhost:9000/minio/health/live"]
      interval: 30s
      timeout: 10s
      retries: 3

  # (可选)MinIO 客户端工具容器,用于管理操作
  mc:
    image: minio/mc:latest
    container_name: minio-client
    hostname: minio-client
    environment:
      MC_HOST_minio: http://admin:your_strong_password_123@minio1:9000
      # 配置mc客户端别名,便于执行管理命令
    networks:
      - minio-cluster
    entrypoint: >
      sh -c "
      until mc ready minio; do echo '等待MinIO集群就绪...'; sleep 5; done;
      echo '集群已就绪,创建默认存储桶...';
      mc mb minio/document-bucket;
      mc anonymous set download minio/document-bucket;
      echo '初始化完成';
      tail -f /dev/null
      "
    # 等待集群就绪后自动创建存储桶并设置权限
    depends_on:
      - minio1
      - minio2
      - minio3
      - minio4
    restart: on-failure

networks:
  minio-cluster:
    driver: bridge
    # 使用bridge网络驱动,创建独立的网络隔离环境
    ipam:
      config:
        - subnet: 172.20.0.0/16
          # 指定子网范围,避免IP冲突
          gateway: 172.20.0.1

volumes:
  node1-data:
    driver: local
  node2-data:
    driver: local
  node3-data:
    driver: local
  node4-data:
    driver: local
    # 定义命名卷,提供更好的数据管理(可选)
EOF
2. 创建并启动集群
# 进入项目目录
cd /opt/minio-cluster

# 启动所有服务(在后台运行)
docker-compose up -d

# 查看启动状态
docker-compose ps

# 查看实时日志
docker-compose logs -f
3. 验证集群状态
# 检查所有容器是否正常运行
docker ps --format "table {{.Names}}\t{{.Status}}\t{{.Ports}}"

# 检查集群健康状态
curl http://localhost:9000/minio/health/cluster

# 检查单个节点健康状态
curl http://localhost:9000/minio/health/live
4. 访问管理控制台
- 控制台地址: http://localhost:9001
- 用户名: admin
- 密码: your_strong_password_123
🛠 三、 Spring Boot 项目搭建
1. 项目结构
document-system/
├── src/main/java/com/company/document/
│   ├── config/
│   ├── controller/
│   ├── service/
│   ├── entity/
│   ├── repository/
│   ├── dto/
│   └── DocumentApplication.java
├── src/main/resources/
│   └── application.yml
└── pom.xml
2. Maven 依赖
<dependencies>
    <dependency>
        <groupId>org.springframework.boot</groupId>
        <artifactId>spring-boot-starter-web</artifactId>
    </dependency>
    <dependency>
        <groupId>org.springframework.boot</groupId>
        <artifactId>spring-boot-starter-data-jpa</artifactId>
    </dependency>
    <dependency>
        <groupId>io.minio</groupId>
        <artifactId>minio</artifactId>
        <version>8.5.6</version>
    </dependency>
    <dependency>
        <groupId>mysql</groupId>
        <artifactId>mysql-connector-java</artifactId>
        <scope>runtime</scope>
    </dependency>
</dependencies>
📊 四、 数据库设计
1. 实体关系图
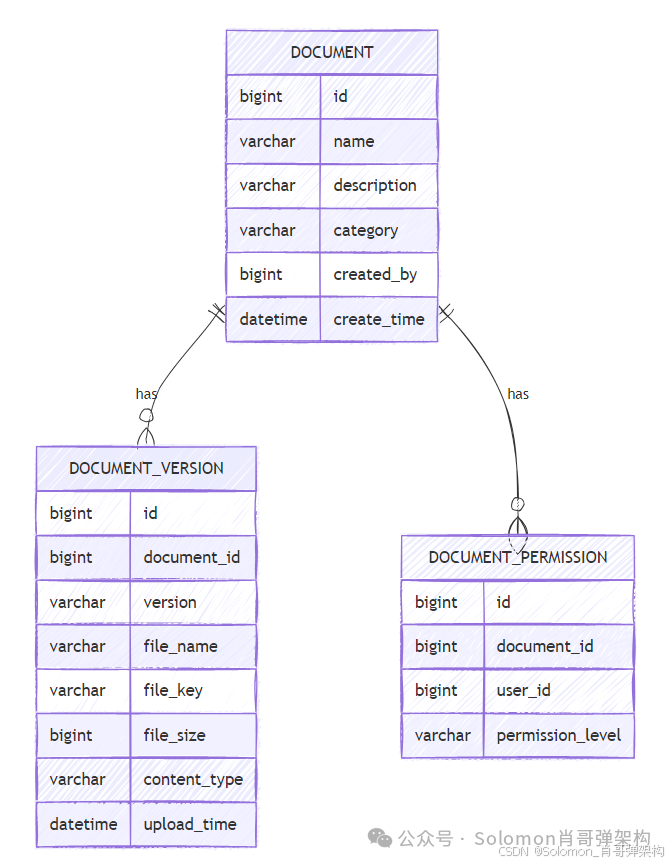
2. SQL 表结构
CREATE TABLE documents (
    id BIGINT PRIMARY KEY AUTO_INCREMENT,
    name VARCHAR(255) NOT NULL,
    description TEXT,
    category VARCHAR(100),
    created_by BIGINT NOT NULL,
    create_time DATETIME DEFAULT CURRENT_TIMESTAMP
);

CREATE TABLE document_versions (
    id BIGINT PRIMARY KEY AUTO_INCREMENT,
    document_id BIGINT NOT NULL,
    version VARCHAR(50) NOT NULL,
    file_name VARCHAR(255) NOT NULL,
    file_key VARCHAR(500) NOT NULL,
    file_size BIGINT NOT NULL,
    content_type VARCHAR(100),
    upload_time DATETIME DEFAULT CURRENT_TIMESTAMP,
    FOREIGN KEY (document_id) REFERENCES documents(id)
);
🔧 五、 核心代码实现
1. MinIO 配置类
/**
 * MinIO 对象存储配置类
 * 负责配置和初始化 MinIO 客户端连接
 *
 * @Configuration 表示这是一个配置类,Spring Boot 启动时会自动处理其中的Bean定义
 */
@Configuration
public class MinioConfig {

    /**
     * MinIO 服务器端点地址
     * 从 application.yml 配置文件中注入,配置示例:
     * minio:
     *   endpoint: http://localhost:9000
     *
     * 支持多种格式:
     * - HTTP: http://minio.example.com:9000
     * - HTTPS: https://minio.example.com:9000
     * - 集群模式: http://minio1:9000,http://minio2:9000 (需要DNS轮询)
     */
    @Value("${minio.endpoint}")
    private String endpoint;

    /**
     * MinIO 访问密钥 (Access Key)
     * 相当于用户名,用于身份认证
     * 生产环境建议使用 vault 或 k8s secret 管理,不要硬编码在配置文件中
     */
    @Value("${minio.accessKey}")
    private String accessKey;

    /**
     * MinIO 秘密密钥 (Secret Key)
     * 相当于密码,用于身份认证
     * 这是敏感信息,生产环境必须加密存储
     */
    @Value("${minio.secretKey}")
    private String secretKey;

    /**
     * 连接超时时间(毫秒)
     * 默认值:10000ms (10秒)
     */
    @Value("${minio.connect-timeout:10000}")
    private int connectTimeout;

    /**
     * 读写超时时间(毫秒)
     * 默认值:30000ms (30秒)
     */
    @Value("${minio.timeout:30000}")
    private int timeout;

    /**
     * 创建 MinIO 客户端 Bean
     *
     * @Bean 表示该方法返回的对象将被Spring容器管理,可以在其他地方通过@Autowired注入
     * @Primary 表示当有多个同类型Bean时,优先使用这个
     *
     * @return 配置好的 MinioClient 实例
     * @throws IllegalArgumentException 如果 endpoint 或 credentials 无效
     */
    @Bean
    @Primary
    public MinioClient minioClient() {
        try {
            // 使用建造者模式创建 MinIO 客户端实例
            MinioClient client = MinioClient.builder()
                    // 设置 MinIO 服务器地址
                    .endpoint(endpoint)
                    // 设置访问凭证(用户名和密码)
                    .credentials(accessKey, secretKey)
                    // 设置连接超时时间
                    .connectTimeout(connectTimeout)
                    // 设置读写超时时间
                    .timeout(timeout)
                    // 构建 MinIO 客户端实例
                    .build();

            // 记录初始化成功日志(实际使用时需要注入Logger)
            System.out.println("MinIO客户端初始化成功,端点: " + endpoint);

            return client;

        } catch (Exception e) {
            // 记录错误日志并抛出运行时异常,阻止应用启动
            throw new IllegalStateException("MinIO客户端初始化失败: " + e.getMessage(), e);
        }
    }

    /**
     * 可选的:创建自定义区域的 MinIO 客户端
     * 用于访问特定区域的存储桶
     */
    @Bean
    public MinioClient minioClientWithRegion() {
        return MinioClient.builder()
                .endpoint(endpoint)
                .credentials(accessKey, secretKey)
                .region("us-east-1") // 设置特定区域
                .build();
    }
}
2. 文档实体类
@Entity
@Table(name = "documents")
@Data
public class Document {
    @Id
    @GeneratedValue(strategy = GenerationType.IDENTITY)
    private Long id;

    private String name;
    private String description;
    private String category;
    private Long createdBy;

    @CreationTimestamp
    private LocalDateTime createTime;

    @OneToMany(mappedBy = "document", cascade = CascadeType.ALL)
    private List<DocumentVersion> versions;
}

@Entity
@Table(name = "document_versions")
@Data
public class DocumentVersion {
    @Id
    @GeneratedValue(strategy = GenerationType.IDENTITY)
    private Long id;

    @ManyToOne
    @JoinColumn(name = "document_id")
    private Document document;

    private String version;
    private String fileName;
    private String fileKey;
    private Long fileSize;
    private String contentType;

    @CreationTimestamp
    private LocalDateTime uploadTime;
}
3. 文件服务层
@Service
@Slf4j
public class FileStorageService {

    @Autowired
    private MinioClient minioClient;

    @Value("${minio.bucket-name}")
    private String bucketName;

    public String uploadFile(MultipartFile file, String fileKey) throws Exception {
        // 检查存储桶是否存在
        boolean found = minioClient.bucketExists(BucketExistsArgs.builder()
                .bucket(bucketName).build());
        if (!found) {
            minioClient.makeBucket(MakeBucketArgs.builder()
                    .bucket(bucketName).build());
        }

        // 上传文件
        minioClient.putObject(PutObjectArgs.builder()
                .bucket(bucketName)
                .object(fileKey)
                .stream(file.getInputStream(), file.getSize(), -1)
                .contentType(file.getContentType())
                .build());

        return fileKey;
    }

    public byte[] downloadFile(String fileKey) throws Exception {
        try (InputStream stream = minioClient.getObject(GetObjectArgs.builder()
                .bucket(bucketName)
                .object(fileKey)
                .build())) {
            return IOUtils.toByteArray(stream);
        }
    }

    public void deleteFile(String fileKey) throws Exception {
        minioClient.removeObject(RemoveObjectArgs.builder()
                .bucket(bucketName)
                .object(fileKey)
                .build());
    }
}
4. 文档管理服务
@Service
@Transactional
public class DocumentService {

    @Autowired
    private DocumentRepository documentRepository;

    @Autowired
    private DocumentVersionRepository versionRepository;

    @Autowired
    private FileStorageService fileStorageService;

    public Document createDocument(Document document, MultipartFile file, Long userId) {
        document.setCreatedBy(userId);
        Document savedDocument = documentRepository.save(document);

        // 保存文件版本
        DocumentVersion version = new DocumentVersion();
        version.setDocument(savedDocument);
        version.setVersion("1.0");
        version.setFileName(file.getOriginalFilename());
        version.setFileSize(file.getSize());
        version.setContentType(file.getContentType());

        String fileKey = generateFileKey(savedDocument.getId(), file.getOriginalFilename());
        version.setFileKey(fileKey);

        try {
            fileStorageService.uploadFile(file, fileKey);
            versionRepository.save(version);
        } catch (Exception e) {
            throw new RuntimeException("文件上传失败", e);
        }

        return savedDocument;
    }

    private String generateFileKey(Long documentId, String fileName) {
        return String.format("documents/%d/%s_%s",
                documentId,
                System.currentTimeMillis(),
                fileName);
    }

    public DocumentVersion downloadDocumentVersion(Long versionId) {
        return versionRepository.findById(versionId)
                .orElseThrow(() -> new RuntimeException("文件版本不存在"));
    }
}
5. REST 控制器
@RestController
@RequestMapping("/api/documents")
@CrossOrigin
public class DocumentController {

    @Autowired
    private DocumentService documentService;

    @PostMapping(consumes = MediaType.MULTIPART_FORM_DATA_VALUE)
    public ResponseEntity<Document> uploadDocument(
            @RequestParam("file") MultipartFile file,
            @RequestParam("name") String name,
            @RequestParam(value = "description", required = false) String description,
            @RequestParam("category") String category,
            @RequestAttribute Long userId) {

        Document document = new Document();
        document.setName(name);
        document.setDescription(description);
        document.setCategory(category);

        Document savedDocument = documentService.createDocument(document, file, userId);
        return ResponseEntity.ok(savedDocument);
    }

    @GetMapping("/{documentId}/download/{versionId}")
    public ResponseEntity<byte[]> downloadDocument(
            @PathVariable Long documentId,
            @PathVariable Long versionId) {

        DocumentVersion version = documentService.downloadDocumentVersion(versionId);

        try {
            byte[] fileContent = fileStorageService.downloadFile(version.getFileKey());

            return ResponseEntity.ok()
                    .header(HttpHeaders.CONTENT_DISPOSITION,
                            "attachment; filename="" + version.getFileName() + """)
                    .contentType(MediaType.parseMediaType(version.getContentType()))
                    .body(fileContent);
        } catch (Exception e) {
            return ResponseEntity.status(HttpStatus.INTERNAL_SERVER_ERROR).build();
        }
    }

    @GetMapping
    public ResponseEntity<List<Document>> listDocuments(
            @RequestParam(required = false) String category) {

        List<Document> documents;
        if (category != null) {
            documents = documentService.findByCategory(category);
        } else {
            documents = documentService.findAll();
        }

        return ResponseEntity.ok(documents);
    }
}
⚙️ 六、 应用配置
1. application.yml
server:
  port: 8080

spring:
  datasource:
    url: jdbc:mysql://localhost:3306/document_db
    username: root
    password: mysql_password
    driver-class-name: com.mysql.cj.jdbc.Driver
  jpa:
    hibernate:
      ddl-auto: update
    show-sql: true
    properties:
      hibernate:
        dialect: org.hibernate.dialect.MySQLDialect

minio:
  endpoint: http://localhost:9000
  accessKey: admin
  secretKey: your_strong_password_123
  bucket-name: document-bucket

logging:
  level:
    com.company.document: DEBUG
    io.minio: INFO
🧪 七、功能测试与验证
1. 测试脚本
@SpringBootTest
class DocumentSystemApplicationTests {

    @Autowired
    private DocumentService documentService;

    @Autowired
    private MinioClient minioClient;

    @Test
    void testFileUploadAndDownload() throws Exception {
        // 创建测试文件
        MockMultipartFile file = new MockMultipartFile(
                "file",
                "test.pdf",
                "application/pdf",
                "test content".getBytes());

        Document document = new Document();
        document.setName("测试文档");
        document.setCategory("合同");

        Document savedDoc = documentService.createDocument(document, file, 1L);

        assertNotNull(savedDoc.getId());
        assertFalse(savedDoc.getVersions().isEmpty());

        // 验证文件是否存在于 MinIO
        StatObjectResponse stat = minioClient.statObject(StatObjectArgs.builder()
                .bucket("document-bucket")
                .object(savedDoc.getVersions().get(0).getFileKey())
                .build());

        assertEquals(file.getSize(), stat.size());
    }
}
2. API 测试用例
# 上传文档
curl -X POST http://localhost:8080/api/documents \
  -H "Authorization: Bearer <token>" \
  -F "file=@contract.pdf" \
  -F "name=销售合同" \
  -F "category=合同" \
  -F "description=2024年销售合同"

# 获取文档列表
curl -X GET http://localhost:8080/api/documents?category=合同

# 下载文档
curl -X GET http://localhost:8080/api/documents/1/download/1 \
  -H "Authorization: Bearer <token>" \
  --output downloaded_contract.pdf
📈 八、 系统监控与运维
1. 健康检查端点
@RestController
@RequestMapping("/api/health")
public class HealthController {

    @Autowired
    private MinioClient minioClient;

    @GetMapping("/minio")
    public ResponseEntity<String> checkMinioHealth() {
        try {
            minioClient.listBuckets();
            return ResponseEntity.ok("MinIO connection is healthy");
        } catch (Exception e) {
            return ResponseEntity.status(HttpStatus.SERVICE_UNAVAILABLE)
                    .body("MinIO connection failed: " + e.getMessage());
        }
    }
}
2. 监控配置
management:
  # 端点配置部分
  endpoints:
    # Web端点配置(HTTP暴露)
    web:
      # 端点暴露配置
      exposure:
        # 包含哪些端点对外暴露
        include: health,info,metrics
    # 单个端点详细配置
    endpoint:
      # health端点的特定配置
      health:
        # 显示健康详情的方式
        show-details: always
配置功能说明:
2.1. management.endpoints.web.exposure.include
作用: 控制哪些监控端点通过 HTTP 对外暴露
可选值:
health- 应用健康状态检查info- 应用基本信息metrics- 应用指标数据env- 环境变量信息beans- Spring Bean 信息mappings- URL 映射信息loggers- 日志配置信息*- 暴露所有端点(生产环境不推荐)
安全建议: 生产环境只暴露必要的端点,避免信息泄露
2.2. management.endpoint.health.show-details
作用: 控制健康检查结果的详细程度
可选值:
never- 从不显示详情(默认值)when-authorized- 仅对授权用户显示详情always- 总是显示详情
2.3. 完整的生产环境配置示例
management:
  server:
    port: 9090  # 管理端口与业务端口分离
  endpoints:
    web:
      base-path: /manage  # 修改基础路径
      exposure:
        include: health,info,metrics
      cors:
        allowed-origins: "https://monitor.example.com"
        allowed-methods: "GET"
    jmx:
      exposure:
        include: "*"
  endpoint:
    health:
      show-details: when_authorized
      probes:
        enabled: true  # 启用K8s就绪性和存活性探针
      group:
        readiness:
          include: db,minio,diskSpace
        liveness:
          include: ping
        custom:
          include: db,minio,redis
    metrics:
      enabled: true
    info:
      enabled: true
    env:
      enabled: true
      show-values: when_authorized
    beans:
      enabled: false  # 生产环境禁用敏感端点
    shutdown:
      enabled: false
  metrics:
    export:
      prometheus:
        enabled: true
    distribution:
      percentiles: [0.5, 0.75, 0.95, 0.99]
    tags:
      application: ${spring.application.name}
      environment: ${spring.profiles.active}
  trace:
    http:
      enabled: true

info:
  app:
    name: "@project.name@"
    version: "@project.version@"
    description: "@project.description@"
  build:
    timestamp: "@build.timestamp@"
    java:
      version: "@java.version@"
  env:
    profiles: "${spring.profiles.active}"
    zone: "${zone:unknown}"
2.4. 访问方式
启动应用后,可以通过以下URL访问监控端点:
- 健康检查:
http://localhost:8080/actuator/health - 应用信息:
http://localhost:8080/actuator/info - 性能指标:
http://localhost:8080/actuator/metrics - 特定指标:
http://localhost:8080/actuator/metrics/jvm.memory.used - Prometheus:
http://localhost:8080/actuator/prometheus
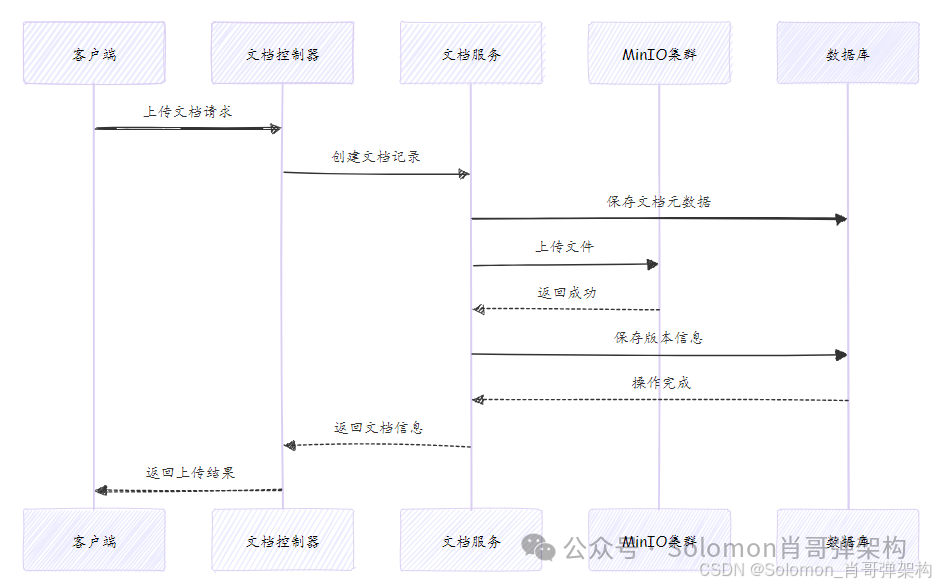
🎯 九、 业务流程图
💡 十、 高级功能扩展
1. 版本控制实现
/**
 * 为指定文档添加新版本
 * 这是一个核心业务方法,负责文档的版本管理和文件存储
 *
 * @param documentId 文档ID,指定要添加版本的文档
 * @param file 上传的文件对象,包含文件内容和元数据
 * @param versionComment 版本注释,描述本次版本更新的内容(可选)
 * @return DocumentVersion 保存成功的版本对象
 * @throws RuntimeException 当文档不存在或文件上传失败时抛出
 *
 * 方法流程:
 * 1. 验证文档存在性
 * 2. 计算新版本号
 * 3. 创建版本记录
 * 4. 上传文件到存储服务
 * 5. 保存版本元数据
 */
@Transactional(rollbackFor = Exception.class) // 添加事务管理,任何异常都回滚
public DocumentVersion addVersion(Long documentId, MultipartFile file, String versionComment) {
    // 参数校验
    if (file == null || file.isEmpty()) {
        throw new IllegalArgumentException("上传文件不能为空");
    }

    if (documentId == null) {
        throw new IllegalArgumentException("文档ID不能为空");
    }

    // 1. 查询文档实体,使用自定义异常更友好
    Document document = documentRepository.findById(documentId)
            .orElseThrow(() -> new DocumentNotFoundException("文档不存在,ID: " + documentId));

    // 2. 获取当前最新版本号并递增
    // 使用Optional和Stream API安全地获取最大版本
    String currentVersion = document.getVersions().stream()
            .max(Comparator.comparing(DocumentVersion::getUploadTime)) // 按上传时间排序
            .map(DocumentVersion::getVersion) // 提取版本号字符串
            .orElse("0.0"); // 如果没有历史版本,默认从"0.0"开始

    // 版本号递增逻辑(主版本.次版本)
    String newVersion = incrementVersion(currentVersion);

    // 3. 创建新的版本记录对象
    DocumentVersion version = new DocumentVersion();
    version.setDocument(document); // 设置关联的文档
    version.setVersion(newVersion); // 设置新版本号
    version.setFileName(file.getOriginalFilename()); // 原始文件名
    version.setFileSize(file.getSize()); // 文件大小(字节)
    version.setContentType(file.getContentType()); // 文件MIME类型
    version.setVersionComment(versionComment); // 版本注释
    version.setUploadTime(LocalDateTime.now()); // 上传时间
    version.setUploadBy(getCurrentUserId()); // 上传用户(需要实现)

    // 4. 生成唯一的文件存储键(避免文件名冲突)
    // 格式: documents/{documentId}/versions/{timestamp}_{filename}
    String fileKey = generateFileKey(documentId, file.getOriginalFilename());
    version.setFileKey(fileKey);

    try {
        // 5. 上传文件到MinIO对象存储
        // 这里可能会抛出IOException或MinIO相关异常
        fileStorageService.uploadFile(file, fileKey);

        // 6. 保存版本元数据到数据库
        DocumentVersion savedVersion = versionRepository.save(version);

        // 记录操作日志
        log.info("文档版本添加成功 - 文档ID: {}, 版本号: {}, 文件名: {}, 大小: {}字节",
                documentId, newVersion, file.getOriginalFilename(), file.getSize());

        return savedVersion;

    } catch (Exception e) {
        // 7. 异常处理:记录详细错误日志并抛出业务异常
        log.error("文档版本上传失败 - 文档ID: {}, 文件名: {}, 错误信息: {}",
                documentId, file.getOriginalFilename(), e.getMessage(), e);

        // 抛出具体的业务异常,便于上层处理
        throw new FileUploadException("版本上传失败: " + e.getMessage(), e);
    }
}
更多推荐

 20
20 0
0- 0


 已为社区贡献3条内容

所有评论(0)